将一个小图放置在一个小盒子里,当鼠标在小盒子里移动时,出现一个移动块,右侧出现一个大盒子,显示出小盒子中移动块所在区域的等比例放大的图片内容。需要实现的效果如下:
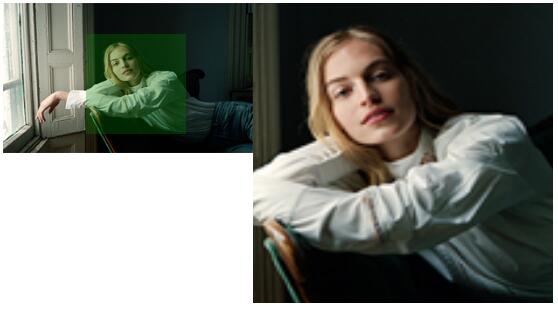
基本实现思路为:右侧大盒子为一个可视区域,有左侧小盒子中的图片的等比例放大图片,通过计算图片需要移动的距离来显示出想要放大的内容,超出部分设置为隐藏。
<head>
    <meta charset="UTF-8">
    <title>放大镜</title>
    <style type="text/css" media="screen">
        img {
      width: 250px;
      height: 150px;
    }
    #pic_wrap {
      position: relative;
      width: 250px;
      height: 150px;
    float: left;
    }
    #float_box {
      width: 100px;
      height: 100px;
      background-color: green;
      filter: opacity(alpha: 30);
      opacity: 0.3;
      position: absolute;
      display: none;
    }
    #big_img {
      background-image: url(images/Layer14.png);
      height: 450px;
      width: 750px;
      background-repeat: no-repeat;
      background-size: cover;
      position: relative;
    }
    #show {
      width: 300px;
      height: 300px;
    float: left;
      background-color: white;
      opacity: 1;
      filter: opacity(alpha:1);
      overflow: hidden;
      display: none;
    }
    </style>
</head>
<body>
    <!-- 原始图片区域 -->
    <div id="pic_wrap">
        <!-- 放大镜所示区域 -->
        <div id="float_box"></div>
        <img src="images/Layer14.png" >
    </div>
    <div id="show">
        <!-- 预留的放大后的图片 -->
        <img src="images/Layer14.png" id="big_img">
    </div>
</body>
HTML和CSS写好之后,利用js给放大镜加交互效果
当鼠标移入的时候,放大镜能够显示出来!需要加onmouseover事件。
当鼠标没有移除,且鼠标在图片内不停地移动, 需要加onmousemove事件。
当鼠标完全移除后,需要加onmouseout事件。
onmouseover事件需要让放大镜和可视窗口显示出来。
onmousemove事件,让放大镜和可视窗口中的图片同时移动。
onmouseout时间,让放大镜和可是窗口消失!
JS代码如下:
var pic_wrap = document.getElementById(‘pic_wrap‘),
    float_box = document.getElementById("float_box"),
    show = document.getElementById(‘show‘);
    big_img = document.getElementById("big_img");
  //鼠标移入事件,让放大镜和放大区显示!
  pic_wrap.onmouseover = function() {
    float_box.style.display = "block";
    show.style.display = "block";
  }
  //鼠标不断移动时触发,实时更新放大镜得到的图片
  pic_wrap.onmousemove = function(event) {
    floatMove(float_box, pic_wrap, event);
    showPic();
  }
  //鼠标移出后,放大镜和放大区隐藏
  pic_wrap.onmouseout = function() {
    float_box.style.display = "none";
    show.style.display = "none";
  }
      //由于offset方法包括边框,在使用的时候很容易出现问题,所以用style来实时获取attr!
  function getStyle(obj, attr) {
    if (window.currentStyle) {
      return parseInt(obj.currentStyle[attr]);
    }
    else {
      return parseInt(getComputedStyle(obj,null)[attr]);
    }
  }
  //运动框架,控制放大镜在原图中的位置!
  function floatMove(argu1, argu2, event) {
    var e = event ||window.event;
    var minLeft = getStyle(argu1, "width");
    var maxLeft = getStyle(argu2, "width") - minLeft/2;
    var minHeight = getStyle(argu1, "height");
    var maxHeight = getStyle(argu2, "height") - minHeight/2;
    console.log(maxLeft);
    console.log(maxLeft - minLeft/2);
    if (e.clientX < minLeft/2) {
      float_box.style.left = "0px";//防止放大镜超出左边框
    }
    else if (e.clientX > maxLeft) {
      float_box.style.left = getStyle(argu2, "width") - getStyle(argu1, "width") + "px";//防止放大镜超出右边框
    }
    else {
      float_box.style.left = event.clientX - minLeft/2 + "px"; //放大镜完全在图片内时正常移动
    }
    if (e.clientY < minHeight/2) {
      float_box.style.top = "0px"; //防止放大镜超出上边框
    }
    else if (e.clientY > maxHeight) {
      float_box.style.top = getStyle(argu2, "height") - getStyle(argu1, "height") + "px"; //防止放大镜超出下边框
    }
    else {
      float_box.style.top = event.clientY - minLeft/2 + "px";
    }
  }
  //用来显示放大镜得到的图片,利用坐标计算!实时更新可视区域
  function showPic() {
    var iCurLeft = getStyle(float_box,"left");
    var iCurTop = getStyle(float_box,"top");
    var a = getStyle(pic_wrap,"width") - getStyle(float_box,"width");
    var b = getStyle(big_img,"width") - getStyle(show,"width");
    var moveWidth = -(iCurLeft/a)*b;
    big_img.style.left = moveWidth + "px";
    var c = getStyle(pic_wrap,"height") - getStyle(float_box,"height");
    var d = getStyle(big_img,"height") - getStyle(show,"height");
    var moveHigth = -(iCurTop/c)*d;
    big_img.style.top = moveHigth + "px";
  }
来源:https://www.cnblogs.com/web12/p/10093486.html
原生Js对文件类型的判断,判断文件是图片,视频等格式
在我们开发中,会遇到这样的场景:1.服务器返回Json数据,根据数据类型来显示是图片还是视频。2.前端上传文件,需要指定文件类型才能上传到服务器。这时候就需要使用Js来判断对应文件的类型
前端图片懒加载的实现,采用Lazy Load 图片延迟加载提高用户体验
对于图片过多的页面,为了加速页面加载速度,所以很多时候我们需要将页面内未出现在可视区域内的图片先不做加载, 等到滚动到可视区域后再去加载。这样子对于页面加载性能上会有很大的提升,也提高了用户体验。
web前端图片加载优化,从图片模糊到清晰的实现过程
在网页图片显示的时候,会发现许多网站采用了先模糊,然后在慢慢清晰的过程,这样的加载用户体验是比较好的,那么如何实现呐?默认加载2张图片,一张缩略图,一张原图,当打开网页的时候默认只显示缩略图

lazysizes.js使用方法_实现图片懒加载、延迟加载的js插件
当你的网站使用了大量图片时候,如果一次性全部加载,那么会严重影响网站的速度。通过lazysizes.js插件就能很好解决这个问题,它可以实现图片的延迟加载【懒加载】

js实现图片局部放大效果
图片局部放大效果结合的知识点主要是DOM的操作,以及事件的应用,所以首先要对DOM的操作有一定了解,其次能对事件的应用有一定的累积。
网站图片优化的重要性与技巧方案
网站图片优化技巧:1、图片名包括关键词,2、Alt标签包括关键词,3、图片周边文本包括关键词,4、GLF和JPGE图画优化,5、在图片链接中运用锚文本关键字

css实现不定宽高的图片img居中裁剪_类似微信朋友圈图片效果
前端需要显示矩形的缩略图,接口返回的图片尺寸大小不一,宽高不相等,需要前端来处理并显示成正方形,类似微信朋友圈图片的效果。那么使用纯css该如何实现不定宽高的图片居中裁剪呢?

原生js 生成海报图_利用canvas合成图片的实现方法
目前浏览器对html5的支持越来越好,我们现在不用服务器端,直接在前端利用canvas就可以进行图片的合成了。下面就介绍下如何通过原生js 来生成海报图

网页中默认图片的几种解决方式
现在网页中图片随处可见,但避免不了有时会出现图片资源失败的情况,这里的alt属性是为了当图片加载失败时告诉用户图片信息的 ,能不能美化一下呢?下面给出几种方式

h5移动端禁止长按图片保存
在移动端访问H5页面的时候,长按图片就会把图片保存起来,为了能够让用户体验更好一些,我们需要长按的时候也不保存图片。那该如何实现呢?下面给出3种解决方案。使用 pointer-events:none、全局属性、加一层遮罩层
内容以共享、参考、研究为目的,不存在任何商业目的。其版权属原作者所有,如有侵权或违规,请与小编联系!情况属实本人将予以删除!