我发现很多人只知道如何常规地使用promise。
在js项目中,promise的使用应该是必不可少的,但我发现在同事和面试官中,很多中级以上的前端仍然坚持promiseInst.then()、promiseInst.catch()、Promise等常规用法等等。即使是 async/await 他们也只知道它但不知道为什么要使用它。
但实际上,Promise 有很多巧妙的高级用法,并且一些高级用法在 alova 请求策略库内部也被广泛使用。
现在,我将与大家分享8个高级使用技巧。希望这些技巧能够对你有所帮助,现在,我们就开始吧。
1. Promise数组的串行执行
例如,如果你有一组接口需要串行执行,你可能首先想到使用await。
const requestAry = [() => api.request1(), () => api.request2(), () => api.request3()];
for (const requestItem of requestAry) {
  await requestItem();
}如果使用promise,可以使用then函数串联多个promise,实现串行执行。
const requestAry = [() => api.request1(), () => api.request2(), () => api.request3()];
const finallyPromise = requestAry.reduce(
     (currentPromise, nextRequest) => currentPromise.then(() => nextRequest()),
     Promise.resolve() // Create an initial promise for linking promises in the array
);
2. 在新的 Promise 范围之外更改状态
假设你有多个页面,其功能要求在允许使用之前收集用户信息。点击使用某个功能之前,会弹出一个弹框进行信息收集。你会如何实施这个?
以下是不同级别前端同学的实现思路:
初级前端:我写一个模态框,然后复制粘贴到其他页面。效率非常高!
中级前端:这个不好维护。我们需要单独封装这个组件,并在需要的页面引入!
高级前端:安装任何密封的东西!!!把方法调用写在所有页面都可以调用的地方不是更好吗?
想要了解高级前端是如何实现的,以vue3为例,看一下下面的例子。
<!-- App.vue -->
<template>
<!-- The following is the modal box component -->
   <div class="modal" v-show="visible">
     <div>
       User name: <input v-model="info.name" />
     </div>
     <!-- Other information -->
     <button @click="handleCancel">Cancel</button>
     <button @click="handleConfirm">Submit</button>
   </div>
   <!-- Page components -->
</template>
<script setup>
import { provide } from 'vue';
const visible = ref(false);
const info = reactive({
   name: ''
});
let resolveFn, rejectFn;
// Pass the information collection function to the following
provide('getInfoByModal', () => {
   visible.value = true;
   return new Promise((resolve, reject) => {
     // Assign the two functions to the outside and break through the promise scope
     resolveFn = resolve;
     rejectFn = reject;
   });
})
const handleConfirm = () => {
   resolveFn && resolveFn(info);
};
const handleCancel = () => {
   rejectFn && rejectFn(new Error('User has canceled'));
};
</script>接下来,getInfoByModal就可以通过直接调用模态框来轻松获取用户填写的数据。
<template>
   <button @click="handleClick">Fill in the information</button>
</template>


<script setup>
import { inject } from 'vue';
const getInfoByModal = inject('getInfoByModal');
const handleClick = async () => {
   // After the call, the modal box will be displayed. After the user clicks to confirm, the promise will be changed to the fullfilled state to obtain the user information.
   const info = await getInfoByModal();
   await api.submitInfo(info);
}
</script>
这也是很多UI组件库中封装常用组件的一种方式。
3. async/await 的替代用法
很多人只知道它是用来在调用await时接收async函数的返回值的,却不知道async函数它实际上是一个返回promise的函数。例如,以下两个函数是等效的:
const fn1 = async () => 1;
const fn2 = () => Promise.resolve(1);
fn1(); // Also returns a promise object with a value of 1
在大多数情况下,await 会跟随 Promise 对象并等待它完全填充。因此,下面的 fn1 函数 wait 也是等价的:
await fn1();
const promiseInst = fn1();
await promiseInst;然而,await也有一个鲜为人知的秘密。当它后面跟的值不是promise对象时,它会用promise对象包装该值,所以await后面的代码必须异步执行。例子:
Promise.resolve().then(() => {
  console.log(1);
});
await 2;
console.log(2);
//Print order bits: 1 2
相当于
Promise.resolve().then(() => {
  console.log(1);
});
Promise.resolve().then(() => {
  console.log(2);
});
4. 承诺实施请求共享
当一个请求已经发出但尚未得到响应时,再次发出相同的请求,就会造成请求的浪费。此时,我们可以将第一个请求的响应与第二个请求共享。
request('GET', '/test-api').then(response1 => {
  // ...
});
request('GET', '/test-api').then(response2 => {
  // ...
});
const pendingPromises = {};
function request(type, url, data) {
// Use the request information as the only request key to cache the promise object being requested
//Requests with the same key will reuse promise
const requestKey = JSON.stringify([type, url, data]);
if (pendingPromises[requestKey]) {
return pendingPromises[requestKey];
}
const fetchPromise = fetch(url, {
method: type,
data: JSON.stringify(data)
})
.then(response => response.json())
.finally(() => {
delete pendingPromises[requestKey];
});
return pendingPromises[requestKey] = fetchPromise;
}上述两个请求实际上只发送一次,同时收到相同的响应值。
那么,请求共享有哪些使用场景呢?我认为有以下三个:
当页面渲染多个内部组件同时获取数据时;
提交按钮未禁用且用户连续多次点击提交按钮;
预加载数据的情况下,预加载完成之前进入预加载页面;
这也是alova的高级功能之一。要实现请求共享,需要使用promise的缓存功能,即一个promise对象可以通过多次await获取数据。简单的实现思路如下:
const promise = new Promise((resolve, reject) => {
  resolve();
  reject();
});
正确答案是已满状态。我们只需要记住,一旦待处理的promise从一种状态转移到另一种状态,就无法更改。因此,例子中是先转为fulfilled状态,然后reject()就不会再转为rejected状态。
6.彻底明确then/catch/finally返回值
一句话概括就是,上面三个函数都会返回一个新的promise包装对象。包装后的值是执行回调函数的返回值。如果回调函数抛出错误,它将包装拒绝状态承诺。似乎不太容易理解,我们来看一个例子:
我们可以将它们一一复制到浏览器控制台并运行它们以帮助理解。
// then function
Promise.resolve().then(() => 1); // The return value is new Promise(resolve => resolve(1))
Promise.resolve().then(() => Promise.resolve(2)); // Return new Promise(resolve => resolve(Promise.resolve(2)))
Promise.resolve().then(() => {
   throw new Error('abc')
}); // Return new Promise(resolve => resolve(Promise.reject(new Error('abc'))))
Promise.reject().then(() => 1, () => 2); // The return value is new Promise(resolve => resolve(2))

//catch function
Promise.reject().catch(() => 3); // The return value is new Promise(resolve => resolve(3))
Promise.resolve().catch(() => 4); // The return value is new Promise(resolve => resolve(promise object that calls catch))
//When the finally function returns a non-promise value, return the promise object before the finally function.
Promise.resolve().finally(() => {}); // Return Promise.resolve()
Promise.reject().finally(() => {}); // Return Promise.reject()
// When the return value of the finally function is promise, wait for the returned promise to be parsed before returning the promise object before the finally function.
Promise.resolve(5).finally(() => new Promise(res => {
   setTimeout(res, 1000);
})); // Return the Promise in pending status, which will be resolved to 5 after 1 second.
Promise.reject(6).finally(() => new Promise(res => {
   setTimeout(res, 1000);
})); // Return the Promise in the pending state, and throw the number 6 after 1 second
7、then函数的第二次回调和catch回调有什么区别?
当请求发生错误时,会触发 Promise 的 then 的第二个回调函数和 catch。乍一看没有区别,但实际上前者无法捕获then当前第一个回调函数中抛出的错误,但catch可以。
Promise.resolve().then(
   () => {
     throw new Error('Error from success callback');
   },
   () => {
     // will not be executed
   }
).catch(reason => {
   console.log(reason.message); // Will print out "error from success callback"
});
原理就如上一点所说的。catch 函数是在 then 函数返回的处于拒绝状态的 Promise 上调用的,因此它的错误自然可以被捕获。
8.(最终)Promise实现koa2洋葱中间件模型
koa2框架引入了洋葱模型,可以让你的请求像剥洋葱一样一层层进去,再一层层出来,从而实现请求前后处理的统一。
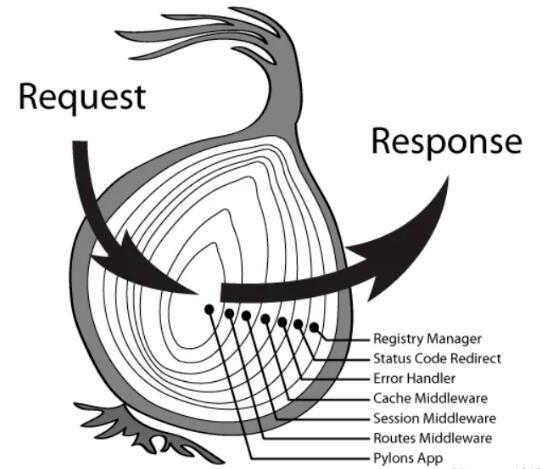
我们来看一个简单的 koa2 洋葱模型:
const app = new Koa();
app.use(async (ctx, next) => {
  console.log('a-start');
  await next();
  console.log('a-end');
});
app.use(async (ctx, next) => {
  console.log('b-start');
  await next();
  console.log('b-end');
});


app.listen(3000);
上面的输出是a-start -> b-start -> b-end -> a-end,这样神奇的输出序列是如何实现的呢?有人没天赋,简单的用20行左右的代码就实现了。如有雷同,纯属巧合。
接下来我们分析一下
注:以下内容对新手不友好,请谨慎阅读。
首先先保存中间件函数,在listen函数中收到请求后调用洋葱模型执行。
function action(koaInstance, ctx) {
  // ...
}


class Koa {
   middlewares = [];
   use(mid) {
     this.middlewares.push(mid);
   }
   listen(port) {
     // Pseudocode simulates receiving request
     http.on('request', ctx => {
       action(this, ctx);
     });
   }
}
收到请求后,从第一个中间件开始串行执行next之前的前置逻辑。
//Start to start middleware call
function action(koaInstance, ctx) {
   let nextMiddlewareIndex = 1; // Identifies the next middleware index to be executed
   //Define next function
   function next() {
     // Before peeling the onion, calling next will call the next middleware function
     const nextMiddleware = middlewares[nextMiddlewareIndex];
     if (nextMiddleware) {
       nextMiddlewareIndex++;
       nextMiddleware(ctx, next);
     }
   }
   //Start execution from the first middleware function and pass in the ctx and next functions
   middlewares[0](ctx, next);
}
处理next之后的post逻辑
function action(koaInstance, ctx) {
   let nextMiddlewareIndex = 1;
   function next() {
     const nextMiddleware = middlewares[nextMiddlewareIndex];
     if (nextMiddleware) {
       nextMiddlewareIndex++;
       // A return is also added here to allow the execution of the middleware function to be executed in series from back to front using promises (it is recommended to understand this return repeatedly)
       return Promise.resolve(nextMiddleware(ctx, next));
     } else {
       // When the pre-logic of the last middleware is executed, return the fullyfilled promise and start executing the post-logic after next.
       return Promise.resolve();
     }
   }
   middlewares[0](ctx, next);
}
至此,一个简单的洋葱模型就已经实现了。

你真的了解 Promise 吗?Promise 必知必会(十道题)
Promise 想必大家十分熟悉,想想就那么几个 api,可是你真的了解 Promise 吗?本文根据 Promise 的一些知识点总结了十道题,看看你能做对几道。
剖析Promise内部结构,一步一步实现一个完整的、能通过所有Test case的Promise类
本文写给有一定Promise使用经验的人,如果你还没有使用过Promise,这篇文章可能不适合你,Promise标准中仅指定了Promise对象的then方法的行为,其它一切我们常见的方法/函数都并没有指定.
Async/Await替代Promise的6个理由
Async/Await替代Promise的6个理由:Async/Await是近年来JavaScript添加的最革命性的的特性之一。它会让你发现Promise的语法有多糟糕,而且提供了一个直观的替代方法。
Promise 原理解析与实现(遵循Promise/A+规范)
Promise是JS异步编程中的重要概念,异步抽象处理对象,是目前比较流行Javascript异步编程解决方案之一,Promise 是一个构造函数, new Promise 返回一个 promise对象 接收一个excutor执行函数作为参数
简单模仿实现 Promise 的异步模式
这篇文章是考虑如何自己实现一个简单 Promise,用以理解 Promise。和原生 Promise的调用方法一样,支持链式调用,本文实现的方法只能用于参考Promise的原理,还有很多特性没有实现,比如 race,all 方法的实现。
数组的遍历你都会用了,那Promise版本的呢
在对数组进行一些遍历操作时,发现有些遍历方法对Promise的反馈并不是我们想要的结果。async/await为Promise的语法糖,文中会直接使用async/await替换Promise;map可以说是对Promise最友好的一个函数了,
Promise使用时应注意的问题
最近在使用axios库时遇到了个问题,后端接口报了500错误,但前端并未捕获到。在axios整体配置的代码中,过滤http code时,调用了filter401()、filter500(),但是这里注意并未将两个filter函数的结果返回,也就是并未返回promise,这就是导致问题出现的原因

es6 Promise 的基础用法
想必接触过Node的人都知道,Node是以异步(Async)回调著称的,其异步性提高了程序的执行效率,但同时也减少了程序的可读性。如果我们有几个异步操作,并且后一个操作需要前一个操作返回的数据才能执行
关于 Promise 的 9 个提示
你可以在 .then 里面 return 一个 Promise,每次执行 .then 的时候都会自动创建一个新的 Promise,对调用者来说,Promise 的 resolved/rejected 状态是唯一的,Promise 构造函数不是解决方案,使用 Promise.resolve
手写一款符合Promise/A+规范的Promise
Promise的一些用法在此不多赘述,本篇主要带领你手写一个Promise源码,学完你就会发现:Promise没有你想象中的那么难.本篇大概分为以下步骤:实现简单的同步Promise、增加异步功能、增加链式调用then、增加catch finally方法、增加all race 等方法、实现一个promise的延迟对象defer、最终测试
内容以共享、参考、研究为目的,不存在任何商业目的。其版权属原作者所有,如有侵权或违规,请与小编联系!情况属实本人将予以删除!