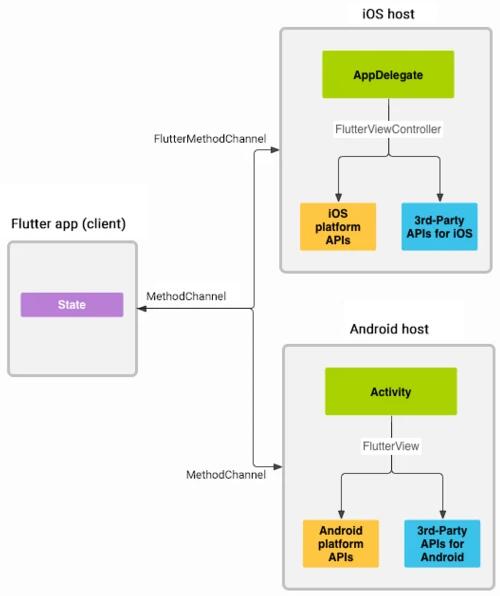
对于混编工程来说,最常用的需求就是双端的数据通信。在Flutter中,SDK提供了platform_channels来进行跨端通信,它的整体架构如下所示。
官方文档中提供了一个比较全的例子,下面我们通过这个例子,来好好分析下,如何使用Flutter和原生的通信管道。
https://github.com/flutter/samples/blob/master/platform_channels/README.md
MethodChannel
MethodChannel提供了Flutter调用原生方法的能力。
MethodChannel的构建需要两个参数,一个是BinaryMessenger,通常从Flutter Engine中获取,可以通过普通的Engine构建,也可以通过EngineCache预热引擎来获取,当然也可以使用EngineGroup来获取,如果在FlutterActivity里面,可以直接在configureFlutterEngine回调中获取。另一个参数是name,用于标识这个Channel。
通常在Flutter中使用时,会将Method封装起来,类似下面的代码。
import 'package:flutter/services.dart';

/// This class includes implementation of two platform methods [increment],
/// and [decrement] which are used to increment and decrement value
/// of count respectively.
class Counter {
  /// Creates a [MethodChannel] with the specified name to invoke platform method.
  /// In order to communicate across platforms, the name of MethodChannel
  /// should be same on native and dart side.
  static MethodChannel methodChannel = const MethodChannel('methodChannelDemo');

  /// This method is responsible to increment and return the value of count.
  static Future<int> increment({required int counterValue}) async {
    final result = await methodChannel.invokeMethod<int>('increment', {'count': counterValue});
    return result!;
  }

  /// This method is responsible to decrement and return the value of count.
  static Future<int> decrement({required int counterValue}) async {
    final result = await methodChannel.invokeMethod<int>('decrement', {'count': counterValue});
    return result!;
  }
}
其中——methodChannelDemo就是这个MethodChannel的Name。通过这个标志,我们就可以找到对应的MethodChannel。
在具体的方法调用处,使用MethodChannel的invokeMethod来调用具体的函数,和MethodChannel本身一样,也是通过Name标志符来调用的,参数以Map的形式进行传递。
那么在具体调用的地方,使用代码如下所示。
onPressed: () async {
  try {
    final value = await Counter.increment(counterValue: count);
    setState(() => count = value);
  } catch (error) {
  }
},
那么在Android中呢?我们需要为前面定义的协议实现具体的逻辑。
首先,在FlutterActivity的configureFlutterEngine回调中,通过指定的MethodChannel Name创建MethodChannel,然后再通过setMethodCallHandler来监听Flutter端的调用,call参数中包含了method和argument,可以用来获取调用的函数标志符和参数。
MethodChannel(flutterEngine.dartExecutor, "methodChannelDemo")
        .setMethodCallHandler { call, result ->
            val count: Int? = call.argument<Int>("count")

            if (count == null) {
                result.error("INVALID ARGUMENT", "Value of count cannot be null", null)
            } else {
                when (call.method) {
                    "increment" -> result.success(count + 1)
                    "decrement" -> result.success(count - 1)
                    else -> result.notImplemented()
                }
            }
        }
根据不同的Method Name,我们可以判断使用不同的方法,并通过result来返回结果,result的不同类型,代表了返回值的不同类型。
EventChannel
EventChannel用于在事件流中将消息传递给Flutter端。
EventChannel与MethodChannel一样,在Flutter中通过Name来进行标志。
但与MethodChannel不同的是,EventChannel返回一个Stream,借助下面的模板代码,我们可以了解EventChannel的基本使用。
import 'package:flutter/services.dart';

/// This class includes the implementation for [EventChannel] to listen to value
/// changes from the Accelerometer sensor from native side. It has a [readings]
/// getter to provide a stream of [AccelerometerReadings].
class Accelerometer {
  static const _eventChannel = EventChannel('eventChannelDemo');

  /// Method responsible for providing a stream of [AccelerometerReadings] to listen
  /// to value changes from the Accelerometer sensor.
  static Stream<AccelerometerReadings> get readings {
    return _eventChannel.receiveBroadcastStream().map(
          (dynamic event) => AccelerometerReadings(
            event[0] as double,
            event[1] as double,
            event[2] as double,
          ),
        );
  }
}

class AccelerometerReadings {
  /// Acceleration force along the x-axis.
  final double x;

  /// Acceleration force along the y-axis.
  final double y;

  /// Acceleration force along the z-axis.
  final double z;

  AccelerometerReadings(this.x, this.y, this.z);
}
在调用的地方,需要通过StreamBuilder来承载EventChannel返回的Stream,并从其中获取到相应的数据并展示。
child: StreamBuilder<AccelerometerReadings>(
  stream: Accelerometer.readings,
  builder: (context, snapshot) {
    if (snapshot.hasError) {
      return Text((snapshot.error as PlatformException).message!);
    } else if (snapshot.hasData) {
      return Column(
        mainAxisAlignment: MainAxisAlignment.center,
        children: [
          Text(
            'x axis: ' + snapshot.data!.x.toStringAsFixed(3),
            style: textStyle,
          ),
          Text(
            'y axis: ' + snapshot.data!.y.toStringAsFixed(3),
            style: textStyle,
          ),
          Text(
            'z axis: ' + snapshot.data!.z.toStringAsFixed(3),
            style: textStyle,
          )
        ],
      );
    }
在Android中,我们需要获取一个Stream流,并通过EventChannel传递给Flutter,首先,创建一个SensorManager,用来获取传感器的值,并借助EventChannel.EventSink将数据发出。
class AccelerometerStreamHandler(sManager: SensorManager, s: Sensor) : EventChannel.StreamHandler, SensorEventListener {
    private val sensorManager: SensorManager = sManager
    private val accelerometerSensor: Sensor = s
    private lateinit var eventSink: EventChannel.EventSink

    override fun onListen(arguments: Any?, events: EventChannel.EventSink?) {
        if (events != null) {
            eventSink = events
            sensorManager.registerListener(this, accelerometerSensor, SensorManager.SENSOR_DELAY_UI)
        }
    }

    override fun onCancel(arguments: Any?) {
        sensorManager.unregisterListener(this)
    }

    override fun onAccuracyChanged(sensor: Sensor?, accuracy: Int) {}

    override fun onSensorChanged(sensorEvent: SensorEvent?) {
        if (sensorEvent != null) {
            val axisValues = listOf(sensorEvent.values[0], sensorEvent.values[1], sensorEvent.values[2])
            eventSink.success(axisValues)
        } else {
            eventSink.error("DATA_UNAVAILABLE", "Cannot get accelerometer data", null)
        }
    }
}
在调用的地方,同样与MethodChannel类似,先借助Name找到对应的EventChannel,再设置setStreamHandler来创建Stream。
val sensorManger: SensorManager = getSystemService(Context.SENSOR_SERVICE) as SensorManager
val accelerometerSensor: Sensor = sensorManger.getDefaultSensor(Sensor.TYPE_ACCELEROMETER)
EventChannel(flutterEngine.dartExecutor, "eventChannelDemo")
        .setStreamHandler(AccelerometerStreamHandler(sensorManger, accelerometerSensor))
BasicMessageChannel
BasicMessageChannel提供了从原生侧获取元数据的一种通信方式。
从原生侧获取图片
在Flutter侧,与前面的操作类似,我们需要一个Name标志来标志BasicMessageChannel,然后再通过调用send方法来发送一个指令,同时异步获取该指令的返回值。
/// This class manages a [BasicMessageChannel] that can return an image loaded
/// from a native asset. The [BasicMessageChannel] uses [StandardMessageCodec]
/// since it supports [Uint8List], which is used to transport the image data.
class PlatformImageFetcher {
  static const _basicMessageChannel = BasicMessageChannel<dynamic>('platformImageDemo', StandardMessageCodec());

  /// Method responsible for providing the platform image.
  static Future<Uint8List> getImage() async {
    final reply = await _basicMessageChannel.send('getImage') as Uint8List?;
    if (reply == null) {
      throw PlatformException(
        code: 'Error',
        message: 'Failed to load Platform Image',
        details: null,
      );
    }
    return reply;
  }
}
在Flutter中,图片数据使用Uint8List来进行传递。展示图片时,我们需要使用FutureBuilder来进行承载,根据Future的返回状态,来确定展示样式,代码如下所示。
child: FutureBuilder<Uint8List>(
  future: imageData,
  builder: (context, snapshot) {
    if (snapshot.connectionState == ConnectionState.none) {
      return const Placeholder();
    } else if (snapshot.hasError) {
      return Center(
        child: Text(
          (snapshot.error as PlatformException).message!,
        ),
      );
    } else if (snapshot.connectionState ==
        ConnectionState.done) {
      return Image.memory(
        snapshot.data!,
        fit: BoxFit.fill,
      );
    }
    return const CircularProgressIndicator();
  },
在Android侧,我们需要定义同名的Channel和Handler,并通过Stream返回Uint8List数据,代码如下。
// Registers a MessageHandler for BasicMessageChannel to receive a message from Dart and send
// image data in reply.
BasicMessageChannel(flutterEngine.dartExecutor, "platformImageDemo", StandardMessageCodec())
        .setMessageHandler { message, reply ->
            if (message == "getImage") {
                val inputStream: InputStream = assets.open("eat_new_orleans.jpg")
                reply.reply(inputStream.readBytes())
            }
        }
双向通信
BasicMessageChannel可以用于双向通信,这是前面的示例中所没有涉及到的。
首先,我们在Flutter中构建这样一个列表,用于展示一个信息List,信息的来源是原生侧,所以,在Flutter界面的initState中,我们创建一个名为stringCodecDemo的BasicMessageChannel,用来接收数据List,Flutter界面依托List来创建相应的界面。
@override
void initState() {
  super.initState();
  // Receives a string of json object from the platform and converts it to PetModel.
  const BasicMessageChannel<String?>('stringCodecDemo', StringCodec()).setMessageHandler((message) async {
    if (message == null) {
      showSnackBar('An error occurred while adding pet details.', context);
    } else {
      setState(() {
        petListModel = PetListModel.fromJson(message);
      });
    }
    return null;
  });
}
接下来,再创建一个添加数据的Flutter界面,用来添加数据,添加好的数据,通过一个名为_jsonMessageCodecChannel的BasicMessageChannel传递给原生侧。
class PetListMessageChannel {
  static const _jsonMessageCodecChannel = BasicMessageChannel<dynamic>('jsonMessageCodecDemo', JSONMessageCodec());

  /// Method to add a new pet to the list.
  ///
  /// Demonstrates how to use [BasicMessageChannel] and [JSONMessageCodec] to
  /// send more structured data to platform like a [Map] in this case.
  static void addPetDetails(PetDetails petDetails) {
    _jsonMessageCodecChannel.send(petDetails.toJson());
  }
有了新增,自然还有删除,类似的,再创建一个名为binaryCodecDemo的BasicMessageChannel,用来通知原生侧删除数据。
class PetListMessageChannel {

  static const _binaryCodecChannel = BasicMessageChannel('binaryCodecDemo', BinaryCodec());

  /// Method to remove a pet from the list.
  ///
  /// Demonstrates how to use [BasicMessageChannel] and [BinaryCodec] to
  /// send [ByteData] to platform. If the reply received is null, then
  /// we will throw a [PlatformException].
  static Future<void> removePet(int index) async {
    final uInt8List = utf8.encoder.convert(index.toString());
    final reply = await _binaryCodecChannel.send(uInt8List.buffer.asByteData());
    if (reply == null) {
      throw PlatformException(
        code: 'INVALID INDEX',
        message: 'Failed to delete pet details',
        details: null,
      );
    }
  }
}
看到这里,大家可能一脸懵逼,其实,这里是Demo中为了演示不同的Message Codec而故意为之的。获取列表数据,新增,删除,这三个功能,分别使用了StringCodec、JSONMessageCodec和BinaryCodec,其实只使用StringCodec也是可以达到同样的效果的。
由此可见,基于BasicMessageChannel的双向通信,是完全基于协议的通信,双端,甚至是任何一个界面,不论是原生还是Flutter,都基于这套协议来进行通信,在实现时,可能略显繁琐,但完全对各端进行了解耦,可以分别独立的进行开发而不受其它端、页面的限制。
下面我们继续在原生界面中完成相应的操作,我们分别需要对信息List、新增、删除,这三种操作进行实现。
首先,我们创建jsonMessageCodecDemo,即新增操作的MessageHandler。
// Registers a MessageHandler for BasicMessageChannel to receive pet details to be
// added in petList and send the it back to Dart using stringCodecChannel.
BasicMessageChannel(flutterEngine.dartExecutor, "jsonMessageCodecDemo", JSONMessageCodec.INSTANCE)
        .setMessageHandler { message, reply ->
            petList.add(0, gson.fromJson(message.toString(), object : TypeToken<Map<String, String>>() {}.type))
            stringCodecChannel.send(gson.toJson(mapOf("petList" to petList)))
        }
这个BasicMessageChannel用的是JSONMessageCodec,所以我们将新增数据通过Gson进行解析,然后添加到信息List,最后通过列表的BasicMessageChannel,将结果传递出去,信息List的BasicMessageChannel定义如下。
val petList = mutableListOf<Map<String, String>>()
val gson = Gson()

// A BasicMessageChannel for sending petList to Dart.
val stringCodecChannel = BasicMessageChannel(flutterEngine.dartExecutor, "stringCodecDemo", StringCodec.INSTANCE)
最后,再来创建删除的MessageHandler。
// Registers a MessageHandler for BasicMessageChannel to receive the index of pet
// details to be removed from the petList and send the petList back to Dart using
// stringCodecChannel. If the index is not in the range of petList, we send null
// back to Dart.
BasicMessageChannel(flutterEngine.dartExecutor, "binaryCodecDemo", BinaryCodec.INSTANCE)
        .setMessageHandler { message, reply ->
            val index = String(message!!.array()).toInt()
            if (index >= 0 && index < petList.size) {
                petList.removeAt(index)
                val replyMessage = "Removed Successfully"
                reply.reply(ByteBuffer.allocateDirect(replyMessage.toByteArray().size)
                    .put(replyMessage.toByteArray()))
                stringCodecChannel.send(gson.toJson(mapOf("petList" to petList)))
            } else {
                reply.reply(null)
            }
        }
这里除了因为使用的是BinaryCodec,导致代码比较复杂以为,其它和前面的MessageHandler是一样的。
其实,从整个工程来说,这个双向通信的Demo本身是没有意义的,从上面这个代码就能看出,实际上在MessageHandler中,可以直接通过Replay来进行回传消息,所以,这里这样写的原因就是告诉开发者BasicMessageChannel的通信能力,开发者需要结合实际的使用场景来具体分析改如何使用这些Channel。
另外,不管是在Flutter中,还是在原生代码中,都是可以通过Channel来向对方通信的,以BasicMessageChannel为例,原生和Flutter侧,都可以调用send函数来发送消息,也都可以设置setMessageHandler来接收消息,其它几种Channel也是如此。
不过EventChannel有点点不一样,首先,它是由Flutter发起,交给原生侧处理后,再回调通知到Flutter进行处理,原生侧不能主动发起通信,所以不能算是完整的双向通信。
综上
在了解了上面的代码后,我们可以简单的总结一下。
- 大部分的开发场景,我们都可以使用MethodChannel来解决通信问题
- 如果需要更加灵活的控制,我们可以使用BasicMessageChannel
- Flutter从原生获取数据流,可以使用EventChannel
Channel是跨平台通信的核心,熟练掌握Channel的通信代码,才能更好的做到跨平台。

移动跨平台框架Flutter介绍和学习线路
Flutter是一款移动应用程序SDK,一份代码可以同时生成iOS和Android两个高性能、高保真的应用程序。Flutter目标是使开发人员能够交付在不同平台上都感觉自然流畅的高性能应用程序。我们兼容滚动行为、排版、图标等方面的差异。
初识flutter
关注flutter已经好久,因为没有发正式版,所以一直也不想过早的躺浑水,但是最近无意中看到几篇文章,再加上美团和咸鱼等app也一直在做灰度测试,所以上周开始看了一下官方文档,地址:https://flutter.io/docs/get-started/install,然后在此做一下总结。

深入理解Flutter多线程
Flutter默认是单线程任务处理的,如果不开启新的线程,任务默认在主线程中处理。和iOS应用很像,在Dart的线程中也存在事件循环和消息队列的概念,但在Dart中线程叫做isolate。
Flutter1.5 开始,将成为全平台 UI 框架!
Flutter 1.5 的发布,同期也宣布发布 Flutter for Web 的 Preview 版本,正式开启了 Flutter 的全平台 UI 框架之路。早在年初发布的 Flutter 2019 Roadmap 中,就有提到,会在今年支持移动设备之外的平台,对 Web 的支持,算是完成了一个新的里程碑吧。
Flutter支持Web开发了!
Flutter作为一个可移植的UI框架,已经支持现代Web应用开发了!我们很开心已经发布了SDK预览版,这样你可以在Web浏览器里直接运行你的Flutter UI代码。
Flutter 混合开发 (交互通信)
Flutter 与原生之间的通信依赖灵活的消息传递方式:1,Flutter 部分通过平台通道将消息发送到其应用程序的所在的宿主环境(原生应用)。2,宿主环境通过监听平台通道,接收消息。
Flutter 局部路由实现
Flutter是借鉴React的开发思想实现的,在子组件的插槽上,React有this.props.children,Vue有<slot></slot>。当然Flutter也有类似的Widget,那就是Navigator,不过是以router的形式实现(像<router-view></router-view>)。
Flutter Kotlin 到底该如何选择?
这两个技术在当下如何选择,我之前在公众号上的回复是:如果你已经处于一个比较满意的公司,并考虑长期发展,公司并未使用这两个技术,你可以专心钻研公司当下使用的,或者未来将要使用的,这些才能助你在公司步步高升。
Flutter 与 iOS 原生 WebView 对比
本文对比的是 UIWebView、WKWebView、flutter_webview_plugin(在 iOS 中使用的是 WKWebView)的加载速度,内存使用情况。测试网页打开的速度,只需要获取 WebView 在开始加载网页和网页加载完成时的时间戳
Flutter For Web
用来构建漂亮、定制化应用的跨平台的 UI 框架 Flutter 现在已经支持 Web 开发了。我们很高兴推出了一个预览版的 SDK 可以让开发者直接使用 Flutter UI 和业务逻辑代码构建 web 应用
内容以共享、参考、研究为目的,不存在任何商业目的。其版权属原作者所有,如有侵权或违规,请与小编联系!情况属实本人将予以删除!