一、axios的封装
步骤一:安装axios进入vue-cli
npm install axios步骤二:新建一个httpConfig文件下,创建两个js文件,一个作为axios拦截器用,一个封装接口

步骤三:在serviceapi.config.js中封装所有的API接口
const BASEURL  = 'http://192.168.1.112/' //设定一个常量BASEURL,引号内的是接口地址
const URL ={
    mainPage:[{
        mainPage:BASEURL+'api/mainPage/getMainPage',//引号内的接口地址
        loginOn: BASEURL + 'api/system/login',//获取token
    }]

}
//外溢到其他组件
export default{
    URL
}
步骤三:在Http.js中封装axios拦截器
import axios from 'axios' //引入axios组件
import router from '../router'; //引入vue-router组件
import url from './serviceAPI.config' //引入serviceAPI接口


// request拦截器:对请求参数做监听和处理
axios.interceptors.request.use(

    config => {
        //从session storage中获取token
        let token = sessionStorage.getItem("token");
        //在每一个接口的请求头上增加一个token
        if (config.url == url.URL.login[0].loginOn) {
        } else {

            config.headers = {
                'Authorization': token
            }
        }
        return config;
    },
    error => {//请求错误处理
        return Promise.reject(error.response);
    }
);

// 添加response响应拦截器
axios.interceptors.response.use(function (response) {
    // console.log(response.headers.authorization);
    //如果token值发生改变的时候,替换token值
    if (response.headers.authorization) {
        sessionStorage.setItem("token", response.headers.authorization);
    }

    // 对响应数据做点什么
    return response;
}, function (error) {
    // 响应头发生错误发生的操作
    if (error.response.status) {
        switch (error.response.status) {
            // 在登录成功后返回当前页面,这一步需要在登录页操作。
            // 401 token过期
            // 登录过期对用户进行提示
            // 清除本地token和清空sessionStorage的
            // // 跳转登录页面
            case 401:
                // 清除token
                localStorage.removeItem('token');
                // this.$message.error="token已过期";
                // store.commit('loginSuccess', null);
                // 跳转登录页面,并将要浏览的页面fullPath传过去,登录成功后跳转需要访问的页面
                router.replace({
                    path: '/login',
                    query: {
                        redirect: router.currentRoute.fullPath
                    }
                });
                this.$message.error("登入已经过期")

                break;
            // 404请求不存在                /*  */
            case 403:
                Toast({
                    message: '没有当前操作的权限',
                    duration: 1500,
                    forbidClick: true
                });

                // 跳转登录页面,并将要浏览的页面fullPath传过去,登录成功后跳转需要访问的页面
                setTimeout(() => {
                    router.replace({
                        path: '/',
                        query: {
                            redirect: router.currentRoute.fullPath
                        }
                    });
                }, 1000);
                break;
            case 400:
                Toast({
                    message: '参数错误',
                    duration: 1500,
                    forbidClick: true
                });
                // localStorage.removeItem('token');
                // store.commit('loginSuccess', null);
                // 跳转登录页面,并将要浏览的页面fullPath传过去,登录成功后跳转需要访问的页面
                setTimeout(() => {
                    router.replace({
                        path: '/',
                        query: {
                            redirect: router.currentRoute.fullPath
                        }
                    });
                }, 1000);
                break;
            // 其他错误,直接抛出错误提示
            default:
        }
        return Promise.reject(error.response);
    }
});
export default axios;
步骤四:在main.js中引入在分配到其他组件中
// The Vue build version to load with the `import` command
// (runtime-only or standalone) has been set in webpack.base.conf with an alias.
import Vue from 'vue' //引入vue组件
import App from './App' // 引入APP.vue组件
import router from './router' //引入router组件
//引入Http.js拦截器
import axios from './httpConfig/Http'
//引入serviceAPI.config.js管理API接口
import URL from '@/httpConfig/serviceAPI.config.js'

Vue.config.productionTip = false
//把axios拦截器存入vue的变量$axios引用
Vue.prototype.$axios = axios
//把API接口管理URL存入vue的Globel变量中
Vue.prototype.GLOBAL = URL;
/* eslint-disable no-new */
new Vue({
  el: '#app',
  router,
  components: { App },
  template: '<App/>'
})
步驟五:在子组件中引入接口
<template>
  <div id="app">
    <img src="./assets/logo.png">
    <router-view/>
  </div>
</template>

<script>
export default {
  name: 'App',
  data () {
    return {

    }
  },
  methods () {
    //URL.mainPage[0].loginOn接口,data是参数变量, header头部信息参数
    this.$axios.post(URL.mainPage[0].loginOn,data,header)
    .then( res =>{
    //接口请求成功后的回调
    } )
    .catch ( err => {
      //接口请求失败后的回调
    })
  }
}

</script>

<style>

</style>
拓展:怎么封装post和get
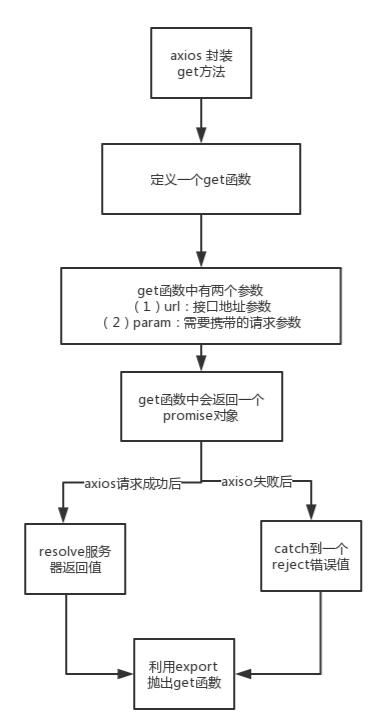
封装axios的get方法:

代码展示:
/*
* axios:get方法封装
* @param {String} url [请求的接口地址]
* @param {Object} params [请求时携带的参数]
*/
export function get(url,params) {
    return new Promise( (resolve,reject)=>{
        axios.get( url, {
           params:params
        } ).then( res => {
            resolve(res.data);
        }).catch( err => {
            reject(err.data);
        })
    } )
   }
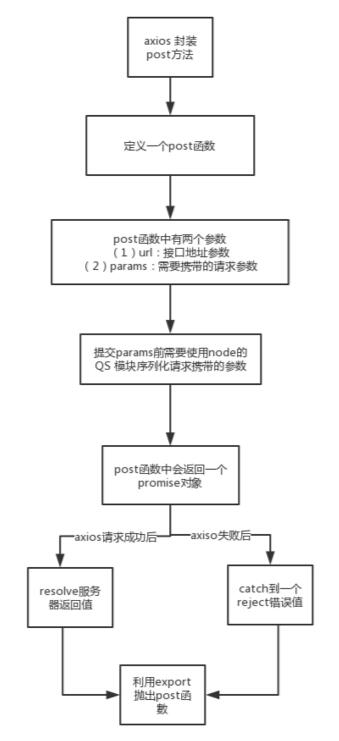
封装axios的post方法:
post方法和get方法相比,提交params参数的时候需要通过node的qs模块进行序列化参数,没有序列化,可能造成后台拿不到前台提交的数据
/*
 *axios:post方法封装
 *@param {string} url [请求接口的地址]
 * @param {object} params [请求时携带的参数]
 * QS.stringify(params) 序列化请求时携带的参数
 *
*/
export function post (url,params){
    return new Promise( (resolve,reject) =>{
        axios.post( url, QS.stringify(params) )
        .then( res => {
            resolve(res.data);
        } )
        .catch( err => {
            reject(err.data)
        } )
    } );
}
把axios get 和post方法引入到serviceAPI.config.js 管理公共接口
在serviceAPI.config中定义一个api的方法,这个方法有一个参数是p,p是作为前端向后端请求接口时候所需要携带的参数,通过export抛出post方法
提供一个公共API 接口:https://api.apiopen.top/
import {get,post} from './Http' //引入axios的get 和post方法
/*
*定义一个变量为p,p为所携带的参数
*/
export const api = p => post('https://api.apiopen.top/EmailSearch?number=1012002',p)
在各个子组件的引用
template>
  <div id="app">
    <img src="./assets/logo.png">
    <router-view/>
  </div>
</template>

<script>
  import{api} from "./httpConfig/serviceAPI.config";
export default {
  name: 'App',
  data () {
    return {

    }
  },
  methods: {
   test () {
     api() //api({data})//在api中需要请求的参数
     .then ( res =>{
       //成功后返回的数据
       console.log(res)
     })
   }
  },
  mounted () {
    this.test() //调用test方法
  }
}

</script>

<style>

</style>本文内容仅供个人学习/研究/参考使用,不构成任何决策建议或专业指导。分享/转载时请标明原文来源,同时请勿将内容用于商业售卖、虚假宣传等非学习用途哦~感谢您的理解与支持!
axios处理Http请求的基本使用方法总汇
axios的功能特性:在浏览器中发送 XMLHttpRequests 请求,在 node.js 中发送 http请求,支持 Promise API,拦截请求和响应,转换请求和响应数据,自动转换 JSON 数据,客户端支持保护安全免受 XSRF 攻击
axios的特点与使用_解决处理axios兼容性问题
axios基于 Promise 的 HTTP 请求客户端,可同时在浏览器和 node.js 中使用。项目中发现,在安卓4.3及以下的手机不支持axios的使用,主要就是无法使用promise。加上以下polyfill就可以了。
axios常见传参方式_axios中get/post/put/patch请求
Axios 是一个基于 promise 的 HTTP 库,可以用在浏览器和 node.js 中。axios中get/post/put/patch请求。传参格式为 formData ,传参格式为 query 形式 ,传参格式为 raw等

axios-mock-adapter_一个axios调试好用的工具
axios-mock-adapter可以用来拦截http请求,并模拟响应,使用起来也很简单,比如你想模拟下服务器返回个500错误,什么404找不到、403禁止访问、500服务器错误、503服务不可用、504网关超时等等,你都能模拟出来
vue中axios的使用与封装
分享下我自己的axios封装,axios是个很好用的插件,都是一些params对象,所以很方便做一些统一处理。当然首先是npm安装axios 很简单。在src下新建文件夹 service / index.js,接着上代码
vue axios不缓存get请求(防止返回304不更新数据)
最近做项目遇到一款浏览器,由于缓存了get请求,导致不管如何刷新,数据都不更新的问题。以下分享一下解决办法:解决思路就是给每一条get请求增加一个timestamp的参数,value为时间戳
vue中axios请求的封装
发送请求模块目录,@/api/url中存放的是每个模块的URL,使用webpack提供的require.context将src/api/url下后缀为js的所有文件引入,并整理出一个对象。整合common.js & product.js,最终得到的对象如下:
axios基于常见业务场景的二次封装
axios的二次封装,功能实现:1.兼容ie浏览器避免缓存2.减少或更新重复请求3.接口域名使用环境变量4.全局loading状态5.可关闭的全局错误提醒6.可开启携带全局分页参数
Vue+Typescript中在Vue上挂载axios使用时报错
在vue项目开发过程中,为了方便在各个组件中调用axios,我们通常会在入口文件将axios挂载到vue原型身上,如下:这样的话,我们在各个组件中进行请求时
vue axios 拦截器
项目中需要验证登录用户身份是否过期,是否有权限进行操作,所以需要根据后台返回不同的状态码进行判断。axios的拦截器分为请求拦截器和响应拦截器两种。我一般把拦截器写在main.js里。
内容以共享、参考、研究为目的,不存在任何商业目的。其版权属原作者所有,如有侵权或违规,请与小编联系!情况属实本人将予以删除!


