目前主流的前端框架vue和react都采用rollup来打包,为了探索rollup的奥妙,接下来就让我们一步步来探索,并基于rollup搭建一个库打包脚手架,来发布自己的库和组件。
前言
写rollup的文章是因为笔者最近要规范前端开发的业务流程和架构,并提供内部公有组件库和工具库供团队使用。在查阅大量资料并对比了webpack和rollup的优缺点之后,最终选择rollup来作为打包工具,我们最终要实现通过npm的方式安装我们的组件库和工具库:
// 安装
npm install @xuxi/tools
// 使用
import { sleep } from '@xuxi/tools'
下面我们一步步来复盘rollup的配置过程和最佳实践。
rollup介绍
Rollup is a module bundler for JavaScript which compiles small pieces of code into something larger and more complex, such as a library or application. It uses the new standardized format for code modules included in the ES6 revision of JavaScript, instead of previous idiosyncratic solutions such as CommonJS and AMD.
意思大致是说Rollup 是一个 JavaScript 模块打包器,可以将小块代码编译成大块复杂的代码,例如 library 或应用程序。Rollup 对代码模块使用新的标准化格式,这些标准都包含在 JavaScript 的 ES6 版本中,而不是像CommonJS 和 AMD这种特殊解决方案。
rollup最大的亮点就是Tree-shaking,即可以静态分析代码中的 import,并排除任何未使用的代码。这允许我们架构于现有工具和模块之上,而不会增加额外的依赖或使项目的大小膨胀。如果用webpack做,虽然可以实现tree-shaking,但是需要自己配置并且打包出来的代码非常臃肿,所以对于库文件和UI组件,rollup更加适合。
搭建库打包脚手架
1. rollup入门
首先我们安装一下rollup:
npm i rollup -g
然后在本地创建一个项目:
mkdir -p my-project
cd my-project
其次我们创建一个入口并写入如下代码:
// src/main.js
import say from './say.js';
export { say }

// src/say.js
export default function(name){
    console.log(name)
};
基本代码准备好了之后,我们写rollup的配置文件(rollup.config.js在根目录下):
// rollup.config.js
export default {
  input: 'src/main.js',
  output: {
    file: 'bundle.js',
    format: 'cjs'
  }
};
这样,我们在终端执行:
// --config 或 -c 来使用配置文件
rollup -c
这样在更目录下就生成了一个bundle.js,就是我们想要的打包后的文件。我们也可以用package.json来设置打包配置信息,用npm run xxx来打包和测试代码。
2.rollup插件使用
为了更灵活的打包库文件,我们可以配置rollup插件,比较实用的插件有:
- rollup-plugin-node-resolve ---帮助 Rollup 查找外部模块,然后导入
- rollup-plugin-commonjs ---将CommonJS模块转换为 ES2015 供 Rollup 处理
- rollup-plugin-babel --- 让我们可以使用es6新特性来编写代码
- rollup-plugin-terser --- 压缩js代码,包括es6代码压缩
- rollup-plugin-eslint --- js代码检测
打包一个库用以上插件完全够用了,不过如果想实现对react等组件的代码,可以有更多的插件可以使用,这里就不一一介绍了。
我们可以这样使用,类似于webpack的plugin配置:
import resolve from 'rollup-plugin-node-resolve';
import commonjs from 'rollup-plugin-commonjs';
import babel from "rollup-plugin-babel";
import { terser } from 'rollup-plugin-terser';
import { eslint } from 'rollup-plugin-eslint';

export default [
	{
		input: 'src/main.js',
		output: {
			name: 'timeout',
			file: '/lib/tool.js',
			format: 'umd'
		},
		plugins: [
			resolve(),  // 这样 Rollup 能找到 `ms`
			commonjs(), // 这样 Rollup 能转换 `ms` 为一个ES模块
			eslint(),
			babel(),
			terser()
		]
	}
];
是不是很简单呢?个人觉得比webpack的配置简单很多。通过如上配置,虽然能实现基本的javascript文件打包,但是还不够健壮,接下来我们一步步来细化配置。
3.利用babel来编译es6代码
首先我们先安装babel相关模块:
npm i core-js @babel/core @babel/preset-env @babel/plugin-transform-runtime
然后设置.babelrc文件
{
  "presets": [
    [
      "@babel/preset-env",
      {
        "modules": false,
        "useBuiltIns": "usage",
        "corejs": "2.6.10",
        "targets": {
          "ie": 10
        }
      }
    ]
  ],
  "plugins": [
      // 解决多个地方使用相同代码导致打包重复的问题
      ["@babel/plugin-transform-runtime"]
  ],
  "ignore": [
      "node_modules/**"
    ]
}
@babel/preset-env可以根据配置的目标浏览器或者运行环境来自动将ES2015+的代码转换为es5。需要注意的是,我们设置"modules": false,否则 Babel 会在 Rollup 有机会做处理之前,将我们的模块转成 CommonJS,导致 Rollup 的一些处理失败。
为了解决多个地方使用相同代码导致打包重复的问题,我们需要在.babelrc的plugins里配置@babel/plugin-transform-runtime,同时我们需要修改rollup的配置文件:
babel({
  exclude: 'node_modules/**', // 防止打包node_modules下的文件
  runtimeHelpers: true,       // 使plugin-transform-runtime生效
}),
如果你对babel不太熟,可以看我之前webpack的文章或者去官网学习。
4.区分测试环境和开发环境
我们可以在package.json中配置不同的执行脚本和环境变量来对开发和生产做不同的配置:
// package.json
"scripts": {
    "build": "NODE_ENV=production rollup -c",
    "dev": "rollup -c -w",
    "test": "node test/test.js"
  },
我们可以手动导出NODE_ENV为production和development来区分生产和开发环境,然后在代码中通过process.env.NODE_ENV来获取参数。这里我们主要用来设置在开发环境下不压缩代码:
const isDev = process.env.NODE_ENV !== 'production';
// ...
plugins: [
  !isDev && terser()
]
使用eslint来做代码检测
我们可以使用上面的提到的rollup-plugin-eslint来配置:
eslint({
    throwOnError: true,
    throwOnWarning: true,
    include: ['src/**'],
    exclude: ['node_modules/**']
})
然后建立.eslintrc.js来根据自己风格配置具体检测:
module.exports = {
    "env": {
        "browser": true,
        "es6": true,
        "node": true
    },
    "extends": "eslint:recommended",
    "globals": {
        "Atomics": "readonly",
        "SharedArrayBuffer": "readonly",
        "ENV": true
    },
    "parserOptions": {
        "ecmaVersion": 2018,
        "sourceType": "module"
    },
    "rules": {
        "linebreak-style": [
          "error",
          "unix"
        ],
        "quotes": [
          "error",
          "single"
        ]
    }
};
详细的eslint配置可以去官网学习。
5. external属性
使用rollup打包,我们在自己的库中需要使用第三方库,例如lodash等,又不想在最终生成的打包文件中出现jquery。这个时候我们就需要使用external属性。比如我们使用了lodash,
import _ from 'lodash'

// rollup.config.js
{
    input: 'src/main.js',
    external: ['lodash'],
    globals: {
        lodash: '_'
    },
    output: [
	{ file: pkg.main, format: 'cjs' },
	{ file: pkg.module, format: 'es' }
    ]
}
6.导出模式
我们可以将自己的代码导出成commonjs模块,es模块,以及浏览器能识别的模块,通过如下方式设置:
{
  input: 'src/main.js',
  external: ['ms'],
  output: [
	{ file: pkg.main, format: 'cjs' },
	{ file: pkg.module, format: 'es' },
	{ file: pkg.module, format: 'umd' }
  ]
}
发布到npm
如果你是之前没有注册npm账号,你可以通过如下方式配置:
npm adduser
然后输入用户名,邮箱,密码,最后使用npm publish发布。这里介绍包的配置文件,即package.json:
{
  "name": "@alex_xu/time",
  "version": "1.0.0",
  "description": "common use js time lib",
  "main": "dist/tool.cjs.js",
  "module": "dist/time.esm.js",
  "browser": "dist/time.umd.js",
  "author": "alex_xu",
  "homepage": "https://github.com/MrXujiang/timeout_rollup",
  "keywords": [
    "tools",
    "javascript",
    "library",
    "time"
  ],
  "dependencies": {
    // ...
  },
  "devDependencies": {
    // ...
  },
  "scripts": {
    "build": "NODE_ENV=production rollup -c",
    "dev": "rollup -c -w",
    "test": "node test/test.js",
    "pretest": "npm run build"
  },
  "files": [
    "dist"
  ]
}
name是包的名字,可以直接写包名,比如loadash,或者添加域,类似于@koa/router这种,@后面是你npm注册的用户名。key为包的关键字。
发布后,我们可以用类似于下面这种方式安装:
npm install @alex_xu/time
// 使用
import { sleep } from '@alex_xu/time'
// 或
const { sleep } = requrie('@alex_xu/time')
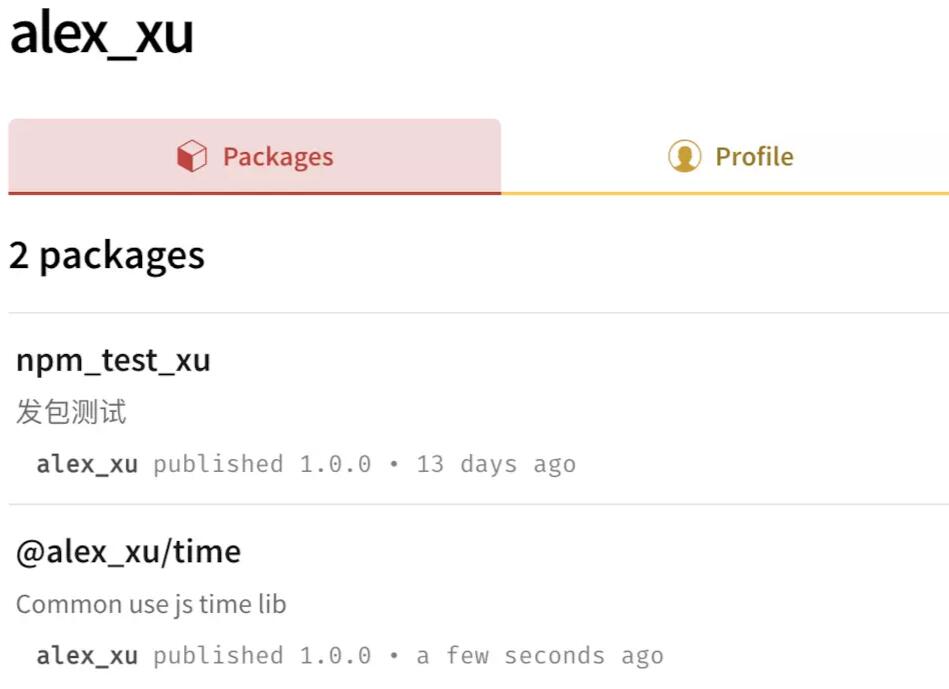
如下是安装截图:


最后
完整配置文件我已经发布到github,如果想了解更多webpack,gulp,css3,javascript,nodeJS,canvas等前端知识和实战,欢迎在公众号《趣谈前端》加入我们一起学习讨论,共同探索前端的边界。
作者:徐小夕_上海
链接:https://juejin.im/post/5dab0cc1e51d4524df35b7b4
本文内容仅供个人学习/研究/参考使用,不构成任何决策建议或专业指导。分享/转载时请标明原文来源,同时请勿将内容用于商业售卖、虚假宣传等非学习用途哦~感谢您的理解与支持!
使用rollup.js打包javasript
rollup是一款小巧的javascript模块打包工具,更适合于库应用的构建工具;可以将小块代码编译成大块复杂的代码,基于ES6 modules,它可以让你的 bundle 最小化
使用Rollup打包并发布到npm
其实用 webpack 也可以打包库,不过根据create-react-app项目贡献者的说法:rollup适合发布 js 库,而webpack更适合做应用程序。简而言之就是:rollup 打包 js 比 webpack 方便,而 webpack 打包 css 比 rollup 方便,相信大家已经有所了解
Rollup.js: 开源JS库的打包利器
Rollup 是一个 JavaScript 模块打包器,说到模块打包器,自然就会想到 webpack。webpack 是一个现代 JavaScript 应用程序的静态模块打包器,那么在 webpack 已经成为前端构建主流的今天,为什么还要用 Rollup 呢?
rollup模块打包器入门
rollup 是一个 JavaScript 模块打包器,可以将小块代码编译成大块复杂的代码,其源码中模块的导入导出采用的是ES6模块语法,即源码需要采用ES6语法进行编写。
rollup配置及使用
业务线长期的积累产生了许许多多重复性的工具方法,业务功能模块等, 我们正好可以用 rollup 构建一个 npm 私服工具包,便于后期业务使用,减少重复性的代码编写。
Vue 是如何用 Rollup 打包的?
Rollup 是一个 JavaScript 模块打包器,它将小块的代码编译并合并成更大、更复杂的代码,比如打包一个库或应用程序。它使用的是 ES Modules 模块化标准,而不是之前的模块化方案
打包工具 rollup.js 入门教程
打包工具的作用是,将多个 JavaScript 脚本合并成一个脚本,供浏览器使用。浏览器需要脚本打包,主要原因有三个。rollup.js 的开发本意,是打造一款简单易用的 ES 模块打包工具,不必配置,直接使用。
内容以共享、参考、研究为目的,不存在任何商业目的。其版权属原作者所有,如有侵权或违规,请与小编联系!情况属实本人将予以删除!


