背景
上月立过一个 flag,看完 vue-router 的源码,可到后面逐渐发现 vue-router 的源码并不是像很多总结的文章那么容易理解,阅读过你就会发现里面的很多地方都会有多层的函数调用关系,还有大量的 this 指向问题,而且会有很多辅助函数需要去理解。但还是坚持啃下来了(当然还没看完,内容是真的多),下面是我在政采云(实习)工作闲暇时间阅读源码的一些感悟和总结,并带分析了大三时期使用的 vue-element-admin 这个 vuer 无所不知的后台框架的动态路由权限控制原理。顺便附带本文实践 demo 地址: 基于后台框架开发的 学生管理系统 。
vue-router 源码分析
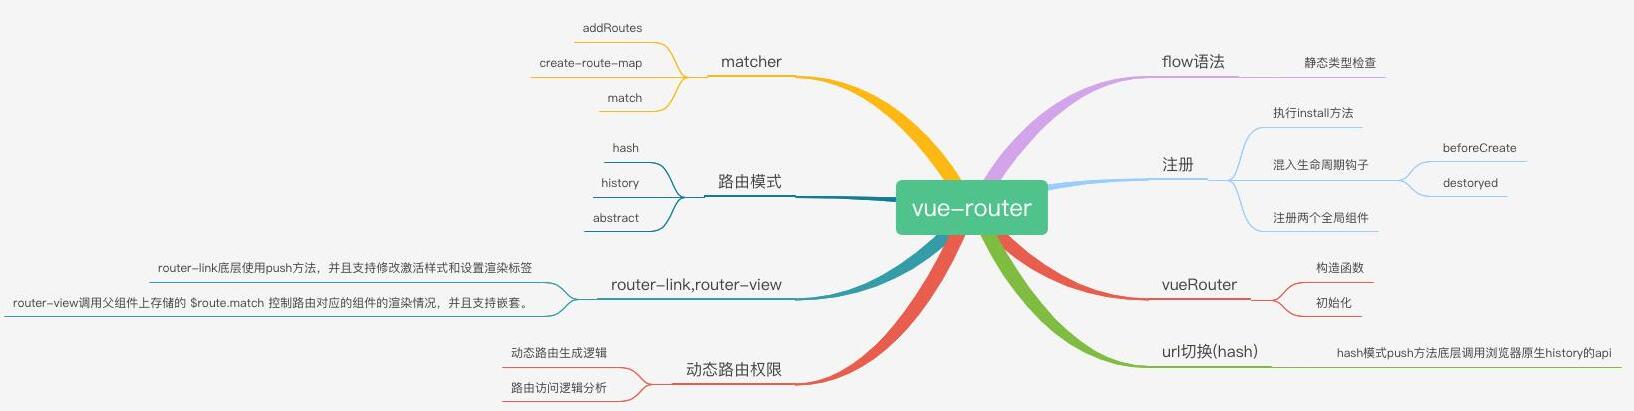
首先阅读源码之前最好是将 Vue 和 vue-router 的源码克隆下来,然后第一遍阅读建议先跟着 官方文档 先走一遍基础用法,然后第二遍开始阅读源码,先理清楚各层级目录的作用和抽出一些核心的文件出来,过一遍代码的同时写个小的 demo 边看边打断点调试,看不懂没关系,可以边看边参考一些总结的比较好的文章,最后将比较重要的原理过程根据自己的理解整理出来,然后画一画相关的知识脑图加深印象。
前置知识: flow 语法
JS 在编译过程中可能看不出一些隐蔽的错误,但在运行过程中会报各种各样的 bug。 flow的作用就是编译期间进行静态类型检查,尽早发现错误,抛出异常。
Vue 、 Vue-router 等大型项目往往需要这种工具去做静态类型检查以保证代码的可维护性和可靠性。本文所分析的 vue-router 源码中就大量的采用了 flow 去编写函数,所以学习 flow 的语法是有必要的。
首先安装 flow 环境,初始化环境
npm install flow-bin -g
flow init
在 index.js 中输入这一段报错的代码
/*@flow*/
function add(x: string, y: number): number {
  return x + y
}
add(2, 11)
在控制台输入 flow ,这个时候不出意外就会抛出异常提示,这就是简单的 flow 使用方法。具体用法还需要参考 flow官网 ,另外这种语法是类似于 TypeScript 的。
注册

我们平时在使用 vue-router 的时候通常需要在 main.js 中初始化 Vue 实例时将 vue-router 实例对象当做参数传入
例如:
import Router from 'vue-router'
Vue.use(Router)
const routes = [
   {
    path: '/student',
    name: 'student',
    component: Layout,
    meta: { title: '学生信息查询', icon: 'documentation', roles: ['student'] },
    children: [
      {
        path: 'info',
        component: () => import('@/views/student/info'),
        name: 'studentInfo',
        meta: { title: '信息查询', icon: 'form' }
      },
      {
        path: 'score',
        component: () => import('@/views/student/score'),
        name: 'studentScore',
        meta: { title: '成绩查询', icon: 'score' }
      }
    ]
  }
  ...
];
const router = new Router({
  mode: "history",
  linkActiveClass: "active",
  base: process.env.BASE_URL,
  routes
});
new Vue({
    router,
    store,
    render: h => h(App)
}).$mount("#app");
Vue.use
那么 Vue.use(Router) 又在做什么事情呢
问题定位到 Vue 源码中的 src/core/global-api/use.js 源码地址
export function initUse (Vue: GlobalAPI) {
  Vue.use = function (plugin: Function | Object) {
    // 拿到 installPlugins
    const installedPlugins = (this._installedPlugins || (this._installedPlugins = []))
    // 保证不会重复注册
    if (installedPlugins.indexOf(plugin) > -1) {
      return this
    }
    // 获取第一个参数 plugins 以外的参数
    const args = toArray(arguments, 1)
    // 将 Vue 实例添加到参数
    args.unshift(this)
    // 执行 plugin 的 install 方法 每个 insatll 方法的第一个参数都会变成 Vue,不需要额外引入
    if (typeof plugin.install === 'function') {
      plugin.install.apply(plugin, args)
    } else if (typeof plugin === 'function') {
      plugin.apply(null, args)
    }
    // 最后用 installPlugins 保存
    installedPlugins.push(plugin)
    return this
  }
}
可以看到 Vue 的 use 方法会接受一个 plugin 参数,然后使用 installPlugins 数组保存已经注册过的 plugin 。 首先保证 plugin 不被重复注册,然后将 Vue 从函数参数中取出,将整个 Vue 作为 plugin 的 install 方法的第一个参数,这样做的好处就是不需要麻烦的另外引入 Vue ,便于操作。 接着就去判断 plugin 上是否存在 install 方法。存在则将赋值后的参数传入执行 ,最后将所有的存在 install 方法的 plugin 交给 installPlugins 维护。
install
了解清楚 Vue.use 的结构之后,可以得出 Vue 注册插件其实就是在执行插件的 install 方法,参数的第一项就是 Vue ,所以我们将代码定位到 vue-router 源码中的 src/install.js 源码地址
// 保存 Vue 的局部变量
export let _Vue
export function install (Vue) {
  // 如果已安装
  if (install.installed && _Vue === Vue) return
  install.installed = true
 // 局部变量保留传入的 Vue
  _Vue = Vue
  const isDef = v => v !== undefined
  const registerInstance = (vm, callVal) => {
    let i = vm.$options._parentVnode
    if (isDef(i) && isDef(i = i.data) && isDef(i = i.registerRouteInstance)) {
      i(vm, callVal)
    }
  }
  // 全局混入钩子函数 每个组件都会有这些钩子函数,执行就会走这里的逻辑
  Vue.mixin({
    beforeCreate () {
      if (isDef(this.$options.router)) {
        // new Vue 时传入的根组件 router router对象传入时就可以拿到 this.$options.router
        // 根 router
        this._routerRoot = this
        this._router = this.$options.router
        this._router.init(this)
        // 变成响应式
        Vue.util.definereactive(this, '_route', this._router.history.current)
      } else {
        // 非根组件访问根组件通过$parent
        this._routerRoot = (this.$parent && this.$parent._routerRoot) || this
      }
      registerInstance(this, this)
    },
    destroyed () {
      registerInstance(this)
    }
  })
  // 原型加入 $router 和 $route
  Object.defineProperty(Vue.prototype, '$router', {
    get () { return this._routerRoot._router }
  })
  Object.defineProperty(Vue.prototype, '$route', {
    get () { return this._routerRoot._route }
  })
// 全局注册
  Vue.component('RouterView', View)
  Vue.component('RouterLink', Link)
// 获取合并策略
  const strats = Vue.config.optionMergeStrategies
  // use the same hook merging strategy for route hooks
  strats.beforeRouteEnter = strats.beforeRouteLeave = strats.beforeRouteUpdate = strats.created
}
可以看到这段代码核心部分就是在执行 install 方法时使用 mixin 的方式将每个组件都混入 beforeCreate , destroyed 这两个生命周期钩子。在 beforeCreate 函数中会去判断当前传入的 router 实例是否是根组件,如果是,则将 _routerRoot 赋值为当前组件实例、 _router 赋值为传入的 VueRouter 实例对象,接着执行 init 方法初始化 router ,然后将 this_route 响应式化。非根组件的话 _routerRoot 指向 $parent 父实例。 然后执行 registerInstance(this,this) 方法,该方法后会,接着原型加入 $router 和 $route ,最后注册 RouterView 和 RouterLink ,这就是整个 install 的过程。
小结
Vue.use(plugin) 实际上在执行 plugin上的 install 方法, insatll 方法有个重要的步骤:
使用 mixin 在组件中混入 beforeCreate , destory 这俩个生命周期钩子
在 beforeCreate 这个钩子进行初始化。
全局注册 router-view , router-link 组件
VueRouter
接着就是这个最重要的 class : VueRouter 。这一部分代码比较多,所以不一一列举,挑重点分析。 vueRouter源码地址 。
构造函数
constructor (options: RouterOptions = {}) {
    this.app  = null
    this.apps = []
    // 传入的配置项
    this.options = options
    this.beforeHooks = []
    this.resolveHooks = []
    this.afterHooks = []
    this.matcher = createMatcher(options.routes || [], this)
    // 一般分两种模式 hash 和 history 路由 第三种是抽象模式
    let mode = options.mode || 'hash'
    // 判断当前传入的配置是否能使用 history 模式
    this.fallback = mode === 'history' && !supportsPushState && options.fallback !== false
    // 降级处理
    if (this.fallback) {
      mode = 'hash'
    }
    if (!inBrowser) {
      mode = 'abstract'
    }
    this.mode = mode
    // 根据模式实例化不同的 history,history 对象会对路由进行管理 继承于history class
    switch (mode) {
      case 'history':
        this.history = new html5History(this, options.base)
        break
      case 'hash':
        this.history = new HashHistory(this, options.base, this.fallback)
        break
      case 'abstract':
        this.history = new AbstractHistory(this, options.base)
        break
      default:
        if (process.env.NODE_ENV !== 'production') {
          assert(false, `invalid mode: ${mode}`)
        }
    }
  }
首先在初始化 vueRouter 整个对象时定义了许多变量, app 代表 Vue 实例, options 代表传入的配置参数,然后就是路由拦截有用的 hooks 和重要的 matcher (后文会写到)。构造函数其实在做两件事情: 1. 确定当前路由使用的 mode 2. 实例化对应的 history 对象。
init
接着完成实例化 vueRouter 之后,如果这个实例传入后,也就是刚开始说的将 vueRouter 实例在初始化 Vue 时传入,它会在执行 beforeCreate 时执行 init 方法
init (app: any) {
  ...
  this.apps.push(app)
  // 确保后面的逻辑只走一次
  if (this.app) {
    return
  }
  // 保存 Vue 实例
  this.app = app
  const history = this.history
  // 拿到 history 实例之后,调用 transitionTo 进行路由过渡
  if (history instanceof HTML5History) {
    history.transitionTo(history.getCurrentLocation())
  } else if (history instanceof HashHistory) {
    const setupHashListener = () => {
      history.setupListeners()
    }
    history.transitionTo(
      history.getCurrentLocation(),
      setupHashListener,
      setupHashListener
    )
  }
}
init 方法传入 Vue 实例,保存到 this.apps 当中。 Vue实例 会取出当前的 this.history ,如果是哈希路由,先走 setupHashListener 函数,然后调一个关键的函数 transitionTo 路由过渡,这个函数其实调用了 this.matcher.match 去匹配。
小结
首先在 vueRouter 构造函数执行完会完成路由模式的选择,生成 matcher ,然后初始化路由需要传入 vueRouter 实例对象,在组件初始化阶段执行 beforeCreate 钩子,调用 init 方法,接着拿到 this.history 去调用 transitionTo 进行路由过渡。
Matcher

之前在 vueRouter 的构造函数中初始化了 macther ,本节将详细分析下面这句代码到底在做什么事情,以及 match 方法在做什么 源码地址 。
this.matcher = createMatcher(options.routes || [], this)首先将代码定位到 create-matcher.js
export function createMatcher (
  routes: Array<RouteConfig>,
  router: VueRouter
): Matcher {
  // 创建映射表
  const { pathList, pathMap, nameMap } = createRouteMap(routes)
  // 添加动态路由
  function addRoutes(routes){...}
  // 计算新路径
  function match (
    raw: RawLocation,
    currentRoute?: Route,
    redirectedFrom?: Location
  ): Route {...}
  // ... 后面的一些方法暂不展开

   return {
    match,
    addRoutes
  }
}
createMatcher 接受俩参数,分别是 routes ,这个就是我们平时在 router.js 定义的路由表配置,然后还有一个参数是 router 他是 new vueRouter 返回的实例。
createRouteMap
下面这句代码是在创建一张 path-record , name-record 的映射表,我们将代码定位到 create-route-map.js 源码地址
export function createRouteMap (
  routes: Array<RouteConfig>,
  oldPathList?: Array<string>,
  oldPathMap?: Dictionary<RouteRecord>,
  oldNameMap?: Dictionary<RouteRecord>
): {
  pathList: Array<string>,
  pathMap: Dictionary<RouteRecord>,
  nameMap: Dictionary<RouteRecord>
} {
  // 记录所有的 path
  const pathList: Array<string> = oldPathList || []
  // 记录 path-RouteRecord 的 Map
  const pathMap: Dictionary<RouteRecord> = oldPathMap || Object.create(null)
   // 记录 name-RouteRecord 的 Map
  const nameMap: Dictionary<RouteRecord> = oldNameMap || Object.create(null)
  // 遍历所有的 route 生成对应映射表
  routes.forEach(route => {
    addRouteRecord(pathList, pathMap, nameMap, route)
  })
  // 调整优先级
  for (let i = 0, l = pathList.length; i < l; i++) {
    if (pathList[i] === '*') {
      pathList.push(pathList.splice(i, 1)[0])
      l--
      i--
    }
  }
  return {
    pathList,
    pathMap,
    nameMap
  }
}
createRouteMap 需要传入路由配置,支持传入旧路径数组和旧的 Map 这一步是为后面递归和 addRoutes 做好准备。 首先用三个变量记录 path , pathMap , nameMap ,接着我们来看 addRouteRecord 这个核心方法。 这一块代码太多了,列举几个重要的步骤
// 解析路径
const pathToRegexpOptions: PathToRegexpOptions =
    route.pathToRegexpOptions || {}
// 拼接路径
const normalizedPath = normalizePath(path, parent, pathToRegexpOptions.strict)
// 记录路由信息的关键对象,后续会依此建立映射表
const record: RouteRecord = {
  path: normalizedPath,
  regex: compileRouteRegex(normalizedPath, pathToRegexpOptions),
  // route 对应的组件
  components: route.components || { default: route.component },
  // 组件实例
  instances: {},
  name,
  parent,
  matchAs,
  redirect: route.redirect,
  beforeEnter: route.beforeEnter,
  meta: route.meta || {},
  props: route.props == null
    ? {}
    : route.components
      ? route.props
      : { default: route.props }
}
使用 recod 对象 记录路由配置有利于后续路径切换时计算出新路径,这里的 path 其实是通过传入父级 record 对象的 path 和当前 path 拼接出来的 。然后 regex 使用一个库将 path 解析为正则表达式。 如果 route 有子节点就递归调用 addRouteRecord
// 如果有 children 递归调用 addRouteRecord
    route.children.forEach(child => {
      const childMatchAs = matchAs
        ? cleanPath(`${matchAs}/${child.path}`)
        : undefined
      addRouteRecord(pathList, pathMap, nameMap, child, record, childMatchAs)
    })
最后映射两张表,并将 record·path 保存进 pathList , nameMap 逻辑相似就不列举了
if (!pathMap[record.path]) {
    pathList.push(record.path)
    pathMap[record.path] = record
  }
废了这么大劲将 pathList 和 pathMap 和 nameMap 抽出来是为啥呢? 首先 pathList 是记录路由配置所有的 path ,然后 pathMap 和 nameMap 方便我们传入 path 或者 name 快速定位到一个 record ,然后辅助后续路径切换计算路由的。
addRoutes
这是在 vue2.2.0 之后新添加的 api ,或许很多情况路由并不是写死的,需要动态添加路由。有了前面的 createRouteMap 的基础上我们只需要传入 routes 即可,他就能在原基础上修改
function addRoutes (routes) {
  createRouteMap(routes, pathList, pathMap, nameMap)
}
并且看到在 createMathcer 最后返回了这个方法,所以我们就可以使用这个方法
return {
    match,
    addRoutes
  }
match
function match (
  raw: RawLocation,
  currentRoute?: Route,
  redirectedFrom?: Location
): Route {
  ...
}
接下来就是 match 方法,它接收 3 个参数,其中 raw 是 RawLocation 类型,它可以是一个 url 字符串,也可以是一个 Location 对象; currentRoute 是 Route 类型,它表示当前的路径; redirectedFrom 和重定向相关。 match 方法返回的是一个路径,它的作用是根据传入的 raw 和当前的路径 currentRoute 计算出一个新的路径并返回。至于他是如何计算出这条路径的,可以详细看一下如何计算出 location 的 normalizeLocation 方法和 _createRoute 方法。
小结
createMatcher : 根据路由的配置描述建立映射表,包括路径、名称到路由 record 的映射关系, 最重要的就是 createRouteMap 这个方法,这里也是动态路由匹配和嵌套路由的原理。
addRoutes : 动态添加路由配置
match : 根据传入的 raw 和当前的路径 currentRoute 计算出一个新的路径并返回。
路由模式
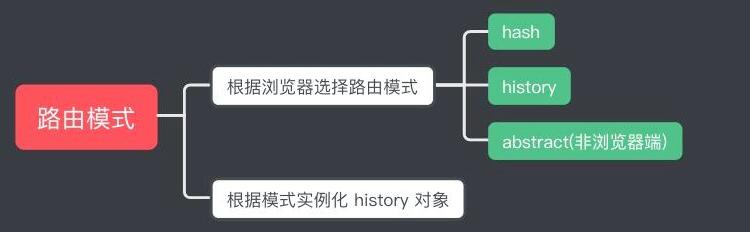
vue-router 支持三种路由模式(mode): hash 、 history 、 abstract ,其中 abstract 是在非浏览器环境下使用的路由模式 源码地址 。
这一部分在前面初始化 vueRouter 对象时提到过,首先拿到配置项的模式,然后根据当前传入的配置判断当前浏览器是否支持这种模式,默认 ie9 以下会降级为 hash 。 然后根据不同的模式去初始化不同的 history 实例。
// 一般分两种模式 hash 和 history 路由 第三种是抽象模式不常用
    let mode = options.mode || 'hash'
    // 判断当前传入的配置是否能使用 history 模式
    this.fallback = mode === 'history' && !supportsPushState && options.fallback !== false
    // 降级处理
    if (this.fallback) {
      mode = 'hash'
    }
    if (!inBrowser) {
      mode = 'abstract'
    }
    this.mode = mode
    // 根据模式实例化不同的 history history 对象会对路由进行管理 继承于 history class
    switch (mode) {
      case 'history':
        this.history = new HTML5History(this, options.base)
        break
      case 'hash':
        this.history = new HashHistory(this, options.base, this.fallback)
        break
      case 'abstract':
        this.history = new AbstractHistory(this, options.base)
        break
      default:
        if (process.env.NODE_ENV !== 'production') {
          assert(false, `invalid mode: ${mode}`)
        }
    }
小结
vue-router 支持三种路由模式, hash 、 history 和 abstract 。默认为 hash ,如果当前浏览器不支持 history 则会做降级处理,然后完成 history 的初始化。
路由切换

切换 url 主要是调用了 push 方法,下面以哈希模式为例,分析 push 方法实现的原理 。 push 方法切换路由的实现原理 源码地址
首先在 src/index.js 下找到 vueRouter 定义的 push 方法
push (location: RawLocation, onComplete?: Function, onAbort?: Function) {
    // $flow-disable-line
    if (!onComplete && !onAbort && typeof Promise !== 'undefined') {
      return new Promise((resolve, reject) => {
        this.history.push(location, resolve, reject)
      })
    } else {
      this.history.push(location, onComplete, onAbort)
    }
  }
接着我们需要定位到 history/hash.js 。这里首先获取到当前路径然后调用了 transitionTo 做路径切换,在回调函数当中执行 pushHash 这个核心方法。
push (location: RawLocation, onComplete?: Function, onAbort?: Function) {
    const { current: fromRoute } = this
    // 路径切换的回调函数中调用 pushHash
    this.transitionTo(
      location,
      route => {
        pushHash(route.fullPath)
        handleScroll(this.router, route, fromRoute, false)
        onComplete && onComplete(route)
      },
      onAbort
    )
  }
而 pushHash 方法在做完浏览器兼容判断后调用的 pushState 方法,将 url 传入
export function pushState (url?: string, replace?: boolean) {
  const history = window.history
  try {
   // 调用浏览器原生的 history 的 pushState 接口或者 replaceState 接口,pushState 方法会将 url 入栈
    if (replace) {
      history.replaceState({ key: _key }, '', url)
    } else {
      _key = genKey()
      history.pushState({ key: _key }, '', url)
    }
  } catch (e) {
    window.location[replace ? 'replace' : 'assign'](url)
  }
}
可以发现, push 底层调用了浏览器原生的 history 的 pushState 和 replaceState 方法,不是 replace 模式 会将 url 推历史栈当中。
另外提一嘴拼接哈希的原理
初始化 HashHistory 时,构造函数会执行 ensureSlash 这个方法
export class HashHistory extends History {
  constructor (router: Router, base: ?string, fallback: boolean) {
    ...
    ensureSlash()
  }
  ...
  }
这个方法首先调用 getHash ,然后执行 replaceHash()
function ensureSlash (): boolean {
  const path = getHash()
  if (path.charAt(0) === '/') {
    return true
  }
  replaceHash('/' + path)
  return false
}
下面是这几个方法
export function getHash (): string {
  const href = window.location.href
  const index = href.indexOf('#')
  return index === -1 ? '' : href.slice(index + 1)
}
// 真正拼接哈希的方法
function getUrl (path) {
  const href = window.location.href
  const i = href.indexOf('#')
  const base = i >= 0 ? href.slice(0, i) : href
  return `${base}#${path}`
}
function replaceHash (path) {
  if (supportsPushState) {
    replaceState(getUrl(path))
  } else {
    window.location.replace(getUrl(path))
  }
}
export function replaceState (url?: string) {
  pushState(url, true)
}
举个例子来说: 假设当前URL是 http://localhost:8080 , path 为空,执行 replcaeHash('/' + path) ,然后内部执行 getUrl 计算出 url 为 http://localhost:8080/#/ ,最后执行 pushState(url,true) ,就大功告成了!
小结
hash 模式的 push 方法会调用路径切换方法 transitionTo ,接着在回调函数中调用 pushHash 方法,这个方法调用的 pushState 方法底层是调用了浏览器原生 history 的方法。 push 和 replace 的区别就在于一个将 url 推入了历史栈,一个没有,最直观的体现就是 replace 模式下浏览器点击后退不会回到上一个路由去 ,另一个则可以。
router-view & router-link
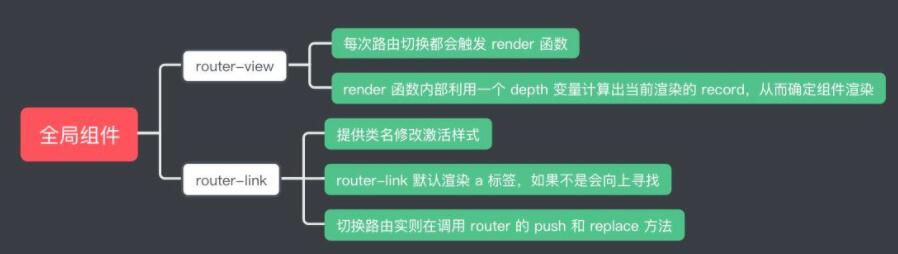
vue-router 在 install 时全局注册了两个组件一个是 router-view 一个是 router-link ,这两个组件都是典型的函数式组件。 源码地址
router-view
首先在 router 组件执行 beforeCreate 这个钩子时,把 this._route 转为了响应式的一个对象
Vue.util.defineReactive(this, '_route', this._router.history.current)所以说每次路由切换都会触发 router-view 重新 render 从而渲染出新的视图。
核心的 render 函数作用请看代码注释
render (_, { props, children, parent, data }) {
    ...
    // 通过 depth 由 router-view 组件向上遍历直到根组件,遇到其他的 router-view 组件则路由深度+1 这里的 depth 最直接的作用就是帮助找到对应的 record
    let depth = 0
    let inactive = false
    while (parent && parent._routerRoot !== parent) {
      // parent.$vnode.data.routerView 为 true 则代表向上寻找的组件也存在嵌套的 router-view
      if (parent.$vnode && parent.$vnode.data.routerView) {
        depth++
      }
      if (parent._inactive) {
        inactive = true
      }
      parent = parent.$parent
    }
    data.routerViewDepth = depth
    if (inactive) {
      return h(cache[name], data, children)
    }
   // 通过 matched 记录寻找出对应的 RouteRecord
    const matched = route.matched[depth]
    if (!matched) {
      cache[name] = null
      return h()
    }
 // 通过 RouteRecord 找到 component
    const component = cache[name] = matched.components[name]
   // 往父组件注册 registerRouteInstance 方法
    data.registerRouteInstance = (vm, val) => {
      const current = matched.instances[name]
      if (
        (val && current !== vm) ||
        (!val && current === vm)
      ) {
        matched.instances[name] = val
      }
    }
  // 渲染组件
    return h(component, data, children)
  }
触发更新也就是 setter 的调用,位于 src/index.js ,当修改 _route 就会触发更新。
history.listen(route => {
  this.apps.forEach((app) => {
    // 触发 setter
    app._route = route
  })
})
router-link
分析几个重要的部分:
设置 active 路由样式
router-link 之所以可以添加 router-link-active 和 router-link-exact-active 这两个 class 去修改样式,是因为在执行 render 函数时,会根据当前的路由状态,给渲染出来的 active 元素添加 class
render (h: Function) {
  ...
  const globalActiveClass = router.options.linkActiveClass
  const globalExactActiveClass = router.options.linkExactActiveClass
  // Support global empty active class
  const activeClassFallback = globalActiveClass == null
    ? 'router-link-active'
    : globalActiveClass
  const exactActiveClassFallback = globalExactActiveClass == null
    ? 'router-link-exact-active'
    : globalExactActiveClass
    ...
}
router-link 默认渲染为 a 标签,如果不是会去向上查找出第一个 a 标签
if (this.tag === 'a') {
   data.on = on
   data.attrs = { href }
 } else {
   // find the first <a> child and apply listener and href
   const a = findAnchor(this.$slots.default)
   if (a) {
     // in case the <a> is a static node
     a.isStatic = false
     const aData = (a.data = extend({}, a.data))
     aData.on = on
     const aAttrs = (a.data.attrs = extend({}, a.data.attrs))
     aAttrs.href = href
   } else {
     // 不存在则渲染本身元素
     data.on = on
   }
 }
切换路由,触发相应事件
const handler = e => {
if (guardEvent(e)) {
 if (this.replace) {
   // replace路由
   router.replace(location)
 } else {
   // push 路由
   router.push(location)
 }
}
}
权限控制动态路由原理分析
我相信,开发过后台项目的同学经常会碰到以下的场景: 一个系统分为不同的角色,然后不同的角色对应不同的操作菜单和操作权限。例如: 教师可以查询教师自己的个人信息查询然后还可以查询操作学生的信息和学生的成绩系统、学生用户只允许查询个人成绩和信息,不允许更改。在 vue2.2.0 之前还没有加入 addRoutes 这个 API 是十分困难的的。
目前主流的路由权限控制的方式是:
登录时获取 token 保存到本地,接着前端会携带 token 再调用获取用户信息的接口获取当前用户的角色信息。
前端再根据当前的角色计算出相应的路由表拼接到常规路由表后面。
登录生成动态路由全过程
了解 如何控制动态路由之后,下面是一张全过程流程图

前端在 beforeEach 中判断:
缓存中存在 JWT 令牌
访问 /login : 重定向到首页 /
访问 /login 以外的路由: 首次访问,获取用户角色信息,然后生成动态路由,然后访问以 replace 模式访问 /xxx 路由。这种模式用户在登录之后不会在 history 存放记录
不存在 JWT 令牌
路由在白名单中: 正常访问 /xxx 路由
不在白名单中: 重定向到 /login 页面
结合框架源码分析
下面结合 vue-element-admin 的源码分析该框架中如何处理路由逻辑的。
路由访问逻辑分析
首先可以定位到和入口文件 main.js 同级的 permission.js , 全局路由守卫处理就在此。 源码地址
const whiteList = ['/login', '/register'] // 路由白名单,不会重定向
// 全局路由守卫
router.beforeEach(async(to, from, next) => {
  NProgress.start() //路由加载进度条
  // 设置 meta 标题
  document.title = getPageTitle(to.meta.title)
  // 判断 token 是否存在
  const hasToken = getToken()
  if (hasToken) {
    if (to.path === '/login') {
      // 有 token 跳转首页
      next({ path: '/' })
      NProgress.done()
    } else {
      const hasRoles = store.getters.roles && store.getters.roles.length > 0
      if (hasRoles) {
        next()
      } else {
        try {
          // 获取动态路由,添加到路由表中
          const { roles } = await store.dispatch('user/getInfo')
          const accessRoutes = await store.dispatch('permission/generateRoutes', roles)
          router.addRoutes(accessRoutes)
          //  使用 replace 访问路由,不会在 history 中留下记录,登录到 dashbord 时回退空白页面
          next({ ...to, replace: true })
        } catch (error) {
          next('/login')
          NProgress.done()
        }
      }
    }
  } else {
    // 无 token
    // 白名单不用重定向 直接访问
    if (whiteList.indexOf(to.path) !== -1) {
      next()
    } else {
      // 携带参数为重定向到前往的路径
      next(`/login?redirect=${to.path}`)
      NProgress.done()
    }
  }
})
这里的代码我都添加了注释方便大家好去理解,总结为一句话就是访问路由 /xxx ,首先需要校验 token 是否存在,如果有就判断是否访问的是登录路由,走的不是登录路由则需要判断该用户是否是第一访问首页,然后生成动态路由,如果走的是登录路由则直接定位到首页,如果没有 token 就去检查路由是否在白名单(任何情况都能访问的路由),在的话就访问,否则重定向回登录页面。
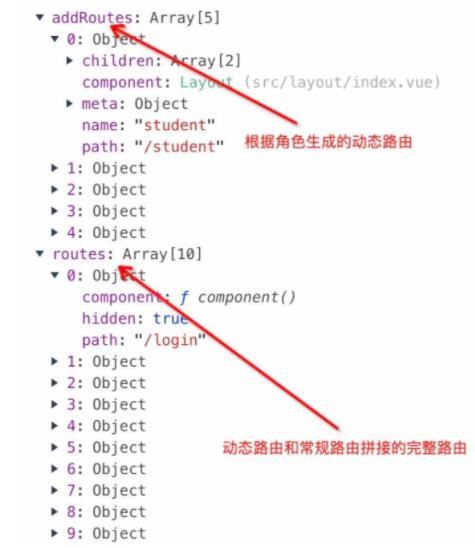
下面是经过全局守卫后路由变化的截图
结合Vuex生成动态路由
下面就是分析这一步 const accessRoutes = await store.dispatch('permission/generateRoutes', roles) 是怎么把路由生成出来的。 源码地址
首先 vue-element-admin 中路由是分为两种的:
constantRoutes: 不需要权限判断的路由
asyncRoutes: 需要动态判断权限的路由
// 无需校验身份路由
export const constantRoutes = [
{
  path: '/login',
  component: () => import('@/views/login/index'),
  hidden: true
}
...
],
// 需要校验身份路由
export const asyncRoutes = [
// 学生角色路由
{
  path: '/student',
  name: 'student',
  component: Layout,
  meta: { title: '学生信息查询', icon: 'documentation', roles: ['student'] },
  children: [
    {
      path: 'info',
      component: () => import('@/views/student/info'),
      name: 'studentInfo',
      meta: { title: '信息查询', icon: 'form' }
    },
    {
      path: 'score',
      component: () => import('@/views/student/score'),
      name: 'studentScore',
      meta: { title: '成绩查询', icon: 'score' }
    }
  ]
}]
...
生成动态路由的源码位于 src/store/modules/permission.js 中的 generateRoutes 方法,源码如下:
generateRoutes({ commit }, roles) {
    return new Promise(resolve => {
      let accessedRoutes
      if (roles.includes('admin')) {
        accessedRoutes = asyncRoutes || []
      } else {
      // 不是 admin 去遍历生成对应的权限路由表
        accessedRoutes = filterAsyncRoutes(asyncRoutes, roles)
      }
      // vuex 中保存异步路由和常规路由
      commit('SET_ROUTES', accessedRoutes)
      resolve(accessedRoutes)
    })
  }
从 route.js 读取 asyncRoutes 和 constantRoutes 之后首先判断当前角色是否是 admin ,是的话默认超级管理员能够访问所有的路由,当然这里也可以自定义,否则去过滤出路由权限路由表,然后保存到 Vuex 中。 最后将过滤之后的 asyncRoutes 和 constantRoutes 进行合并。 过滤权限路由的源码如下:
export function filterAsyncRoutes(routes, roles) {
  const res = []
  routes.forEach(route => {
    // 浅拷贝
    const tmp = { ...route }
    // 过滤出权限路由
    if (hasPermission(roles, tmp)) {
      if (tmp.children) {
        tmp.children = filterAsyncRoutes(tmp.children, roles)
      }
      res.push(tmp)
    }
  })
  return res
}
首先定义一个空数组,对传入 asyncRoutes 进行遍历,判断每个路由是否具有权限,未命中的权限路由直接舍弃 判断权限方法如下:
function hasPermission(roles, route) {
  if (route.meta && route.meta.roles) {
    // roles 有对应路由元定义的 role 就返回 true
    return roles.some(role => route.meta.roles.includes(role))
  } else {
    return true
  }
}
接着需要判断二级路由、三级路由等等的情况,再做一层迭代处理,最后将过滤出来的路由推进数组返回。然后追加到 constantRoutes 后面
SET_ROUTES: (state, routes) => {
    state.addRoutes = routes
    state.routes = constantRoutes.concat(routes)
  }
动态路由生成全过程

总结
vue-router 源码分析部分
注册: 执行 install 方法,注入生命周期钩子初始化
vueRouter: 当组件执行 beforeCreate 传入 router 实例时,执行 init 函数,然后执行 history.transitionTo 路由过渡
matcher : 根据传入的 routes 配置创建对应的 pathMap 和 nameMap ,可以根据传入的位置和路径计算出新的位置并匹配对应的 record
路由模式: 路由模式在初始化 vueRouter 时完成匹配,如果浏览器不支持则会降级
路由 切换: 哈希模式下底层使用了浏览器原生的 pushState 和 replaceState 方法
router-view: 调用父组件上存储的 $route.match 控制路由对应的组件的渲染情况,并且支持嵌套。
router-link: 通过 to 来决定点击事件跳转的目标路由组件,并且支持渲染成不同的 tag ,还可以修改激活路由的样式。
权限控制动态路由部分
路由逻辑: 全局路由拦截,从缓存中获取令牌,存在的话如果首次进入路由需要获取用户信息,生成动态路由,这里需要处理 /login 特殊情况,不存在则判断白名单然后走对应的逻辑
动态生成路由: 传入需要 router.js 定义的两种路由。判断当前身份是否是管理员,是则直接拼接,否则需要过滤出具备权限的路由,最后拼接到常规路由后面,通过 addRoutes 追加。
读后感想
或许阅读源码的作用不能像一篇开发文档一样直接立马对日常开发有所帮助,但是它的影响是长远的,在读源码的过程中都可以学到众多知识,类似闭包、设计模式、时间循环、回调等等 JS 进阶技能,并稳固并提升了你的 JS 基础。当然这篇文章是有缺陷的,有几个地方都没有分析到,比如导航守卫实现原理和路由懒加载实现原理,这一部分,我还在摸索当中。
如果一味的死记硬背一些所谓的面经,或者直接死记硬背相关的框架行为或者 API ,你很难在遇到比较复杂的问题下面去快速定位问题,了解怎么去解决问题,而且我发现很多人在使用一个新框架之后遇到点问题都会立马去提对应的 Issues ,以至于很多流行框架 Issues 超过几百个或者几千个,但是许多问题都是因为我们并未按照设计者开发初设定的方向才导致错误的,更多都是些粗心大意造成的问题。
原文:https://www.zoo.team/article/vue-router-analysis
作者:政采云前端团队
Js中的 forEach 源码
在日常 Coding 中,码农们肯定少不了对数组的操作,其中很常用的一个操作就是对数组进行遍历,查看数组中的元素,然后一顿操作猛如虎。今天暂且简单地说说在 JavaScript 中 forEach。
微信小程序代码源码案例大全
克隆项目代码到本地(git应该都要会哈,现在源码几乎都会放github上,会git才方便,不会的可以自学一下哦,不会的也没关系,gitHub上也提供直接下载的链接);打开微信开发者工具;
Node 集群源码初探
随着这些模块逐渐完善, Nodejs 在服务端的使用场景也越来越丰富,如果你仅仅是因为JS 这个后缀而注意到它的话, 那么我希望你能暂停脚步,好好了解一下这门年轻的语言,相信它会给你带来惊喜
Vue源码之实例方法
在 Vue 内部,有一段这样的代码:上面5个函数的作用是在Vue的原型上面挂载方法。initMixin 函数;可以看到在 initMixin 方法中,实现了一系列的初始化操作,包括生命周期流程以及响应式系统流程的启动
vue源码解析:nextTick
nextTick的使用:vue中dom的更像并不是实时的,当数据改变后,vue会把渲染watcher添加到异步队列,异步执行,同步代码执行完成后再统一修改dom,我们看下面的代码。
React源码解析之ReactDOM.render()
React更新的方式有三种:(1)ReactDOM.render() || hydrate(ReactDOMServer渲染)(2)setState(3)forceUpdate;接下来,我们就来看下ReactDOM.render()源码
React源码解析之ExpirationTime
在React中,为防止某个update因为优先级的原因一直被打断而未能执行。React会设置一个ExpirationTime,当时间到了ExpirationTime的时候,如果某个update还未执行的话,React将会强制执行该update,这就是ExpirationTime的作用。
扒开V8引擎的源码,我找到了你们想要的前端算法
算法对于前端工程师来说总有一层神秘色彩,这篇文章通过解读V8源码,带你探索 Array.prototype.sort 函数下的算法实现。来,先把你用过的和听说过的排序算法都列出来:

jQuery源码之extend的实现
extend是jQuery中一个比较核心的代码,如果有查看jQuery的源码的话,就会发现jQuery在多处调用了extend方法。作用:对任意对象进行扩;’扩展某个实例对象
vuex源码:state及strict属性
state也就是vuex里的值,也即是整个vuex的状态,而strict和state的设置有关,如果设置strict为true,那么不能直接修改state里的值,只能通过mutation来设置
内容以共享、参考、研究为目的,不存在任何商业目的。其版权属原作者所有,如有侵权或违规,请与小编联系!情况属实本人将予以删除!