一、导航切换
封装一个公用组件Tabbar,在需要导航页的页面引入组件即可。代码如下:
<template>
  <div class="tabbar">
	<!-- 占位容器 -->
	<div class="placegolder-container"></div>
	<!-- 底部导航栏 -->
	<div class="bottom-tabs">
	  <div class="tabs-item" v-for="(item, index) in tabsList" :key="index" @click="tabsChange(index)" >
		<img class="tab-icon" :src="tabIndex==index?item.src:item.src1">
		<p class="tab-text" :class="tabIndex==index?'active':''">{{item.text}}</p>
	  </div>
	</div>
  </div>
</template>

<script>
export default {
  name: "tabbar",
  components: {},
  data() {
	return {
	  tabIndex: 0,
	  tabsList: [
		{
		  src: require("../../assets/icon/home.png"),
		  src1: require("../../assets/icon/home1.png"),
		  text: "首页",
		  path: "/"
		},
		{
		  src: require("../../assets/icon/brand.png"),
		  src1: require("../../assets/icon/brand1.png"),
		  text: "礼品",
		  path: "/Gift"
		},
		{
		  src: require("../../assets/icon/find.png"),
		  src1: require("../../assets/icon/find1.png"),
		  text: "发现",
		  path: "/Test"
		},
		{
		  src: require("../../assets/icon/my.png"),
		  src1: require("../../assets/icon/my1.png"),
		  text: "我的",
		  path: "/UploadFile"
		}
	  ]
	};
  },
  created() {
	this.tabIndex = localStorage.getItem("tabIndex");
	console.log(this.tabIndex);
  },
  methods: {
	tabsChange(index) {
	  this.tabIndex = index;
	  this.$router.push({
		path: this.tabsList[index].path
	  });
	  localStorage.setItem("tabIndex", this.tabIndex);
	}
  },
  watch: {
	$route(newVal, oldVal) {
	  // console.log(newVal, oldVal);
	  if (newVal.meta.index >= 0) {
		this.tabIndex = newVal.meta.index;
		localStorage.setItem("tabIndex", this.tabIndex);
	  }
	}
  }
};
</script>


<style scoped lang="less">
.tabbar {
  position: fixed;
  bottom: 0;
  left: 0;
}
.placegolder-container {
  height: 70px;
}

.bottom-tabs {
  position: fixed;
  bottom: 0;
  left: 0;
  right: 0;
  z-index: 5;
  display: flex;
  flex-direction: row;
  justify-content: space-around;
  align-items: center;
  box-shadow: 0px -1px 1px #e6e6e6;
  background-color: #fff;

  .tabs-item {
	padding: 5px 0;
	flex: 1;
	height: 60px;
	display: flex;
	flex-direction: column;
	justify-content: space-around;
	align-items: center;

	.tab-icon {
	  width: 30px;
	  height: 30px;
	  border-radius: 4px;
	}

	.tab-text {
	  font-size: 14px;
	  margin: 0;

	  &.active {
		color: #624980;
	  }
	}
  }
}
</style>
注意:
- 页面设置占位容器是为了抵消底部导航栏固定定位的高度。
- tabIndex 标记当前选中的路由。
- tabsChange(index) 底部导航栏路由切换。
- watch 监听路由变化,保持路由选中的驻留(选中/激活)样式。
二、缓存使用
为什么要使用缓存?缓存哪些内容?
答:使用缓存是为了保存选中路由的 tabIndex ,在刷新页面的时候,依然可以保持(选中/激活)状态。
三、路由配置与监听
(1)配置
在配置路由的时候,我们可以添加 meta对象,里面添加你需要的属性;用于路由切换时获取meta的值, 如:meta.needLogin 规定进入路由需不需登录
{
	  path: '/',
	  name: 'Home',
	  meta: { index: 0, title: '首页',needLogin: false },
	  component: Home
	},
	{
	  path: '/Gift',
	  name: 'Gift',
	  meta: { index: 1, title: '礼品' },
	  component: Gift
	},
	{
	  path: '/Test',
	  name: 'Test',
	  meta: { index: 2, title: '发现',needLogin: true },
	  component: Test,
	  children:[
		{
		  path: '/title1',
		  name: 'Title1',
		  component: Title1
		},
		{
		  path: '/title2',
		  name: 'Title2',
		  component: Title2
		},
		{
		  path: '/title3',
		  name: 'Title3',
		  component: Title3
		}
	  ]
	},
	{
	  path: '/UploadFile',
	  name: 'UploadFile',
	  meta: { index: 3, title: '我的' },
	  component: UploadFile
	},
(2)监听
使用监听的目的是为了在使用浏览器前进后退的时候,保持路由选中的驻留(选中/激活)样式。
watch: {
  $route(newVal, oldVal) {
    // console.log(newVal, oldVal);
    if (newVal.meta.index >= 0) {
  	this.tabIndex = newVal.meta.index;
  	localStorage.setItem("tabIndex", this.tabIndex);
    }
  }
}
四、动态修改页面标题以及增加路由拦截
(1)在修改页面标题 title 的时候,我们可以用配置路由的 title 属性来控制。路由拦截我们即可使用配置路由的 needLogin 属性控制。
//main.js

import store from "./store/index";

// 用来做一些进入页面的配置与限制
router.beforeEach((to, from, next) => {
  console.log({ to, from })
  /*路由发生改变修改页面的title */
  if (to.meta.title) {
	document.title = to.meta.title
  }else{
	document.title = "小鱼蕾蕾"
  }
  /*判断路由是否需要权限才能进入,即路由拦截 */
  if(to.meta.needLogin){
	if(store.state.person.userInfo.userId){ //从vuex里面获取userId
	  next()
	}else{
	  next({path:'/login'})
	}
  }
  next();
})
(2)在store下的modules里增加一个模块 person.js, 然后使用vuex整一个userId
const state = {
  userInfo: {
	userId: 11,
  },
};
// getters
const getters = {
  userInfo: (state) => state.userInfo
};

// actions
const actions = {
  UpdatePerson({ commit }, userInfo) {
	commit("UpdatePerson", userInfo);
  },
};

// mutations
const mutations = {

  UpdatePerson(state, userInfo) {
	// 变更状态
	state.userInfo=userInfo
  },
};

export default {
  state,
  getters,
  actions,
  mutations
};
(3) 在store目录下新建一个 index.js 它通过modules 属性引入 person模块。
import Vue from "vue";
import Vuex from "vuex";
import actions from "./actions";
import getters from "./getter";
import createPersistedState from "vuex-persistedstate";
import person from "./modules/person";

Vue.use(Vuex);

const state = {};

export default new Vuex.Store({
  state,
  mutations,
  actions,
  getters,
  modules: {
	person,
  },
  strict: debug,
  plugins: [createPersistedState({ storage: window.sessionStorage })]
});
五、组件引用
在需要底部导航的页面里引用子组件,如下代码
import Tabbar from './common/Tabbar';//引用子组件
//注册组件
components: {
"Tabbar":Tabbar
},
//html结构底部增加
<!-- 底部菜单 -->
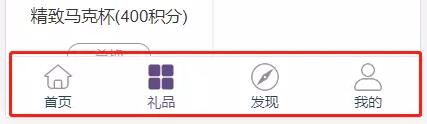
<Tabbar />六、效果图
注:项目代码地址为(仅供参考) https://gitee.com/xiaoyuleilei/vue-cli_demo
移动端H5固定底部导航菜单的三种布局实现
需要把导航固定在底部?只能滑动内容,导航菜单固定不动的。这篇文章主要讲解三种实现方案,包括:fixed,absolute,以及css3的flex布局。
jQuery对底部导航进行跳转并高亮显示
mui的底部菜单,有点费时了,尝试了用vue写,纯js写,还有根据mui的写,还是有些问题和麻烦。直到看了网上的一些例子,才想明白,之前一直是一种点击触发事件才高亮的思维去做
移动端导航布局
写在最前:移动端中导航的网格式布局无处无在,宽高怎么设置相适应?元素怎么居中对齐?不同场景怎么选择代码最高效?巧妙使用margin、padding等基础属性,小小技巧可以解决许多烦恼!
小程序如何自定义导航栏?
setStatusBarHeight、setNavBar这两个方法最好写到app.js中,获取好放在app.globalData中,这两个高度可能不止自定义导航栏需要用到。比如使用了自定义导航栏的页面,因为自定义导航栏是fixed定位脱离文档流
网站导航的设计细节
在快速建站中,每一个细微的方面都会影响网站的优化效果。因此,在做营销网站时,有必要充分考虑并优化每个细节。今天,我们将与您分享一个在实践中容易被忽略且非常重要的细节,即网站导航的设计。
position: sticky实现导航栏下滑吸顶效果
近期开发中遇到导航栏下滑吸顶的需求,经过方案调研,发现position:sticky可以简单快捷的实现功能。sticky(粘贴定位)可以被认为是相对定位和固定定位的混合,元素在跨越特定阀值前为相对定位

推荐一个简洁实用的导航网站,你值得拥有!
大家应该用过像hao123、2345导航、360导航等导航网站吧,随着互联网时代的的发展,导航网站变的越发臃肿,里面挂载了很多广告,新闻等,使的网站看上去很不美观
Vue编程式路由导航和路由守卫
浏览器历史记录有两种写入方式:分别有push和replace,push是追加历史记录,replace是替换当前记录,路由跳转时是push,如何开启replace模式:
element-ui中使用$router.push跳转,导航菜单不高亮解决方案
在使用elment-ui做后台开发过程中,发现如果使用this.$router.push跳到其他的路由,菜单导航不会高亮的问题,下面给出3种解决方案。
内容以共享、参考、研究为目的,不存在任何商业目的。其版权属原作者所有,如有侵权或违规,请与小编联系!情况属实本人将予以删除!