1.为什么需要使用Context
在react中,数据传递一般使用props传递数据,维持单向数据流,这样可以让组件之间的关系变得简单且可预测,但是单项数据流在某些场景中并不适用,看一个官方给出的例子:
有三个组件APP, Toolbar ,ThemedButton,关系如图:(为了方便大家理解(偷懒),这个例子我会全文通用。)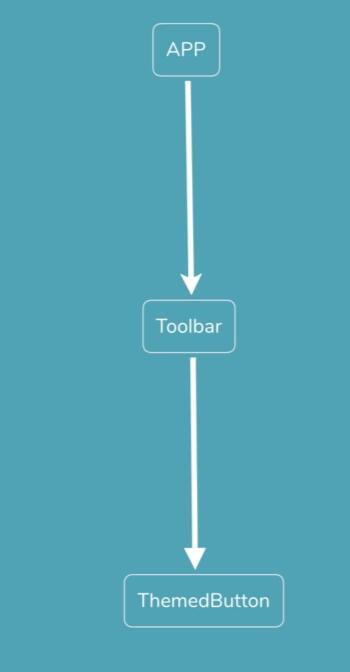
APP存放着主题相关的参数theme,需要传递组件ThemedButton, 如果考虑使用props,那么代码就长这样:
class App extends React.Component {
  render() {
    return <Toolbar theme="dark" />; // 1. 将theme传递给
  }
}

function Toolbar(props) {
  // Toolbar 组件接受一个额外的“theme”属性,然后传递给 ThemedButton 组件。
  return (
    <div>
      <ThemedButton theme={props.theme} /> // 2. 继续往下传递给Button
    </div>
  );
}

class ThemedButton extends React.Component {
  render() {
    return <Button theme={this.props.theme} />; // 最终获取到参数
  }
}
可以看到,实际上需要参数的是组件ThemedButton,但是却必须通过Toolbar作为中介传递。不妨再引申思考一下:
- 如果ThemedButton并非末级子节点,那么参数必须继续向下传递
- 如果App中,还有除了<ThemedButton>以外的组件,也需要theme参数,那么也必须按照这种形式逐层传递
那么数据结构图大概如图所示:
结构图placeholder:层层传递,显然,这样做太!繁!琐!了!接下来,就要介绍今天的主角--Context
2. Context的用法介绍
Context 提供了一种在组件之间共享此类值的方式,而不必显式地通过组件树的逐层传递 props。
上面是官方对于context的介绍,简单来说,就是可以把context当做是特定一个组件树内共享的store,用来做数据传递。
为什么这里要加粗强调组件树呢?因为它是基于树形结构共享的数据:在某个节点开启提供context后,所有后代节点compoent都可以获取到共享的数据。
语言描述略显抽象,直接上代码:
1. 基本使用
以下介绍的是在react 16.x以前的传统写法
class App extends React.Component {
// 核心代码1: 首先在提供context的组件(即provider)里 使用`getChildContext`定义要共享给后代组件的数据,同时使用`childContextTypes`做类型声明
  static childContextTypes = {
        theme: PropTypes.string
  };

  getChildContext () {
    return {
      theme: 'dark'
    }
  }

  render() {
    return <Toolbar />; //  无需再将theme通过props传递
  }
}

function Toolbar(props) {
  return (
    <div>
      <ThemedButton />  // Toolbar 组件不再接受一个额外的“theme”属性
    </div>
  );
}

// 核心代码2: 然后在需要使用context数据(即consumer)的节点,用`contextTypes`声明需要读取的context属性,否则读不到text
class ThemedButton extends React.Component {
    static contextTypes = {
        theme: PropTypes.string
    }

    render() {
        return <h2>{this.context.theme}</h2>; // 直接从context获取到参数 为了直观 这里改用<h2>直接显示出来
    }
}
这个结构图就不画了,显然,就是把theme从层层传递的props中解放出来了。
在代码中我们提到了provider和consumer,这里简单解释下:
context使用的生产者provider- 消费者consumer模式,
- 把提供context的叫做provider,比如例子中的APP,
- 把使用context的称为consumer,对应例子中的ThemedButton。
2. 更新context
如果我们在APP组件提供了一个切换主题的按钮,那就需要context能够更新并且通知到相应的consumer。
由于context本身提供了相关功能:
- getChildContext方法在每次state和props改变时会被调用;
- 一旦provider改变了context,所有的后代组件中的consumer都会重新渲染。
所以通常的方式是:将context的数据保存在Provide的state属性中,每次通过setState更新对应的属性时。
class App extends React.Component {
  static childContextTypes = {
        theme: PropTypes.string
  };

  constructor(props) {
    super(props);
    this.state = {theme:'dark'};
  }

  getChildContext () {
    return {
      theme: this.state.theme // 核心代码,将`context`的值保存在`state`
    }
  }

  render() {
    return <Toolbar />;
  }
}
但是官方文档同时提到了这种方法是有隐患的,下一节进行详细解析。
3. 当context遇到shouldComponentUpdate
再次强调,以下介绍的是在react 16.x以前的版本,关于context新的api会在后面介绍
官方文档提到:
The problem is, if a context value provided by component changes, descendants that use that value won’t update if an intermediate parent returns false from shouldComponentUpdate.
(皇家翻译上场) 拿前面的例子来说,我们在第二节通过使用context,将theme的传递方式由原本的
APP->Toolbar->ThemedButton 通过props层层传递变成: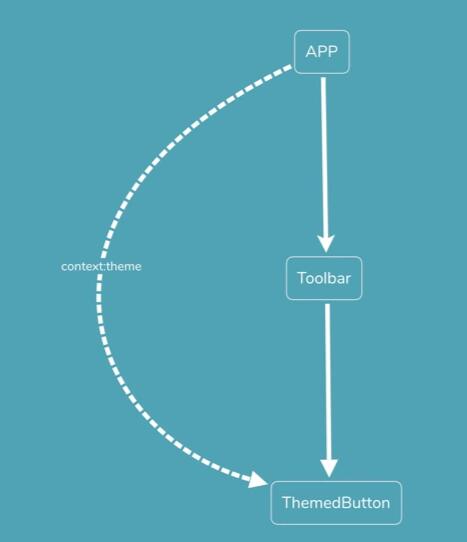
但是组件本身的层级关系依然是APP->Toolbar->ThemedButton。如果我们在中间层Toolbar()
的生命周期shouldComponent返回false会怎么样呢?接下来我们针对Toolbar做一些改动
// 旧写法
function Toolbar(props) {
  return (
    <div>
      <ThemedButton />
    </div>
  );
}

// 新写法 使用PureComponent render内容一样,
// PS:PureComponent内置的shouldComponentUpdate对state和props做了浅比较,这里为了省事直接使用
//如果不熟悉PureComponent可以直接用React.Component,然后补上shouldComponentUpdate里的 浅比较判断
class Toolbar extends React.PureComponent {
    render(){
        return (
            <div>
                <ThemedButton />
            </div>
        );
    }
}
这里为了省事,我们直接使用了PureComponent,接下来会发现:
每次APP更新theme的值时,ThemedButton无法再取到变更后的theme
新的结构图是这样的(注意红线表示来自toolbar的抵抗):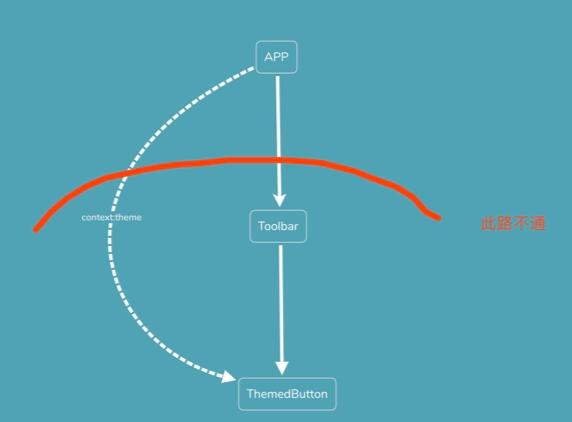
现在问题来了:
由于Toolbar组件是PureComponent,无法重写shouldComponentUpdate,这就意味着位于Toolbar之后的后代节点都无法获取到context的更新!
第一种思路:首先,我们先看看问题的根源之一,是context更新之后,后代节点无法及时获取到更新,那么如果context不发生更,那就不存在这个问题了.【我个人觉得这个思路有点类似于,解决不了问题,可以考虑解决提出问题的人】,也就意味着:
- 设定为不可变对象immutable
- 后代组件应该仅在constructor函数中获取一次context。
- 第二种思路,我们不在context中保存具体的状态值,而是只利用它做个依赖注入。绕开SCU(shouldComponentUpdate),从根本上解决问题。 例如,可以通过发布订阅模型创建一个自我管理的ThemeManage类来解决问题。具体实现如下:
// 核心代码
class ThemeManager {
  constructor(theme) {
    this.theme = theme
    this.subscriptions = []
  }

  // 变更颜色时 提示相关的订阅者
  setColor(theme) {
    this.theme = theme
    this.subscriptions.forEach(f => f())
  }


  // 订阅者接收到响应 触发对应的callbck保证自己的及时更新
  subscribe(f) {
    this.subscriptions.push(f)
  }
}

class App extends React.Component {
  static childContextTypes = {
      themeManager: PropTypes.object // 本次通过context传递一个theme对象
  };

  constructor(props) {
    super(props);
    this.themeManager = new ThemeManager('dark') // 核心代码
  }

  getChildContext () {
    return {theme: this.themeManager} // 核心代码
  }

  render() {
    return <Toolbar />;
  }
}

// Toolbar依然是个PureComponent
class Toolbar extends React.PureComponent {
    render(){
        return (
            <div>
                <ThemedButton />
            </div>
        );
    }
}

class ThemedButton extends React.Component {
    constructor(){
        super();
        this.state = {
            theme: theme:this.context.themeManager.theme
        }
    }
  componentDidMount() {
    this.context.themeManager.subscribe(() => this.setState({
        theme: this.context.themeManager.theme  // 核心代码 保证theme的更新
    }))
  }

  render() {
    return <Button theme={this.state.theme} />; // 核心代码
  }
}
OK,回头看看我们都干了些什么:
- 我们现在不再利用context传递 theme值,而是传递一个themeManager注入对象,这个对象的特点是内置了状态更新和消息通知的功能。
- 消费组件ThemedButton订阅theme的变化,并且利用setState作为回调函数,保证theme值的及时更新。
从而完美绕开了context的传递问题。其实,它同样符合我们第一个解决方案:通过context传递的对象,只被接受一次,并且后续都没有更新(都是同一个themeManager对象,更新是通过themeManager内部的自我管理实现的。)
4. 16.x后的新API
讲完基本用法,接着聊聊context在16.x版本之后的API。
先说一个好消息!使用新API后
每当 Provider(提供者) 的 value 属性发生变化时,所有作为 Provider(提供者) 后代的 consumer(使用者) 组件 都将重新渲染。 从Provider 到其后代使用者的传播不受 shouldComponentUpdate 方法的约束,因此即使祖先组件退出更新,也会更新 consumer(使用者)
换句话说 如果使用context的新API,第三节可以跳过不看。(所以我把那一段写前面去了)
在传统版本,使用getChildContext和childContextTypes来使用context,而在16.x版本之后,前面的例子可以改写成这样:
首先使用createContext创建一个context,该方法返回一个对象,包含Provider(生产者)和Consumer(消费者)两个组件:
const themeContext = React.createContext('light'); // 这里light是默认值 后续使用时可以改变使用Provider组件,指定context需要作用的组件树范围
class App extends React.Component {
  render() {
    // 使用一个 Provider 来将当前的 theme 传递给以下的组件树。
    // 无论多深,任何组件都能读取这个值。
    // 在这个例子中,我们将 “dark” 作为当前的值传递下去。
    return (
      <ThemeContext.Provider value="dark">
        <Toolbar />
      </ThemeContext.Provider>
    );
  }
}

// 中间的组件再也不必指明往下传递 theme 了。
function Toolbar(props) {
  return (
      <ThemedButton />
  );
}
后代组件根据需要,指定contextType需要作用的组件树范围
class ThemedButton extends React.Component {
  // 指定 contextType 读取当前的 theme context。
  // React 会往上找到最近的 theme Provider,然后使用它的值。
  // 在这个例子中,当前的 theme 值为 “dark”。
  static contextType = ThemeContext;
  render() {
    return <Button theme={this.context} />;
  }
}

// 除了写static contextType = ThemeContext 也可以这样写:
ThemedButton.contextType = ThemeContext;
当然,也可以通过Consumer组件指定消费者
class ThemedButton extends React.Component { static contextType = ThemeContext; render() { // Consumer的children必须是一个函数,传递的等于组件树中层这个 context 最接近的 Provider 的对应属性 <ThemeContext.Consumer> { theme =><Button theme={theme} />; // 核心代码 } </ThemeContext.Consumer> } }这两种方式的主要区别是如果需要传递多个可能同名的context时(例如这个例子中Toolbar组件也通过context传递一个theme属性,而ThemedButton需要的是从APP来的theme),只能用Consumer来写
5. 注意事项和其他
对于context的使用,需要注意的主要是以下2点:
- 减少不必要使用context,因为react重视函数式编程,讲究复用,而使用了context的组件,复用性大大降低
- 传统版本的react,尤其要注意context在自己的可控范围内,其实最大的问题也就是前面说的SUC的问题
- 前面说到context的值变更时,Consumer会受到相应的通知,因此要注意某些隐含非预期的变化,例如:
// bad 示例, 因为每次render时{something: 'something'}都指向一个新对象(引用类型的值是老问题,不赘述了)
class App extends React.Component {
  render() {
    return (
      <Provider value={this.state.value}>
        <Toolbar />
      </Provider>
    );
  }
}

// good 示例 使用固定的变量存储值 当然可以选择除了state以外的其他变量
class App extends React.Component {
  constructor(props) {
    super(props);
    this.state = {
      value: {something: 'something'},
    };
  }
  render() {
    return (
      <Provider value={this.state.value}>
        <Toolbar />
      </Provider>
    );
  }
}
顺便提一下react-router其实也用了Context的原理。<Router />、<Link />以及<Route />这些组件之间共享一个router, 才能完成完成复杂的路由操作。有兴趣的可以自行查阅源码。(疯狂偷懒)
总结
本文主要介绍了context在react的常用场景,以及在新旧API模式下的使用方法,着重介绍了shouldComponent的处理方案。
原文:https://segmentfault.com/a/1190000020217926

Vuetify基于vue2.0,为移动而生的组件框架
Vuetify 支持SSR(服务端渲染),SPA(单页应用程序),PWA(渐进式Web应用程序)和标准HTML页面。 Vuetify是一个渐进式的框架,试图推动前端开发发展到一个新的水平。
Vue中插槽的作用_Vue组件插槽的使用以及调用组件内的方法
通过给组件传递参数, 可以让组件变得更加可扩展, 组件内使用props接收参数,slot的使用就像它的名字一样, 在组件内定义一块空间。在组件外, 我们可以往插槽里填入任何元素。slot-scope的作用就是把组件内的数据带出来
react 函数子组件(Function ad Child Component)
函数子组件(FaCC )与高阶组件做的事情很相似, 都是对原来的组件进行了加强,类似装饰者。FaCC,利用了react中children可以是任何元素,包括函数的特性,那么到底是如何进行增强呢?

Vue和React组件之间的传值方式
在现代的三大框架中,其中两个Vue和React框架,组件间传值方式有哪些?组件间的传值是灵活的,可以有多种途径,父子组件同样可以使用EventBus,Vuex或者Redux
vue.js自定义组件directives
自定义指令:以v开头,如:v-mybind。bind的作用是定义一个在绑定时执行一次的初始化动作,观察bind函数,它将指令绑定的DOM作为一个参数,在函数体中,直接操作DOM节点为input赋值。
vue中prop属性传值解析
prop的定义:在没有状态管理机制的时候,prop属性是组件之间主要的通信方式,prop属性其实是一个对象,在这个对象里可以定义一些数据,而这些数据可以通过父组件传递给子组件。 prop属性中可以定义属性的类型,也可以定义属性的初始值。
Web组件简介
Web组件由三个独立的技术组成:自定义元素。很简单,这些是完全有效的HTML元素,包含使用一组JavaScript API制作的自定义模板,行为和标记名称(例如,<one-dialog>)。
web组件调用其他web资源
web组件可以直接或间接的调用其他web资源。一个web组件通过内嵌返回客户端内容的另一个web资源的url来间接调用其他web资源。在执行时,一个web资源通过包含另一个资源的内容或者转发请求到另一个资源直接调用。
vue中如何实现的自定义按钮
在实际开发项目中,有时我们会用到自定义按钮;因为一个项目中,众多的页面,为了统一风格,我们会重复用到很多相同或相似的按钮,这时候,自定义按钮组件就派上了大用场,我们把定义好的按钮组件导出,在全局引用,就可以在其他组件随意使用啦,这样可以大幅度的提高我们的工作效率。
Vue子组件调用父组件的方法
Vue中子组件调用父组件的方法,这里有三种方法提供参考,第一种方法是直接在子组件中通过this.$parent.event来调用父组件的方法,第二种方法是在子组件里用$emit向父组件触发一个事件,父组件监听这个事件就行了。
内容以共享、参考、研究为目的,不存在任何商业目的。其版权属原作者所有,如有侵权或违规,请与小编联系!情况属实本人将予以删除!