Hash
hash 属性是一个可读可写的字符串,该字符串是 URL 的锚部分(从 # 号开始的部分),在页面中的hash有多种功能意义:
锚点
url: http://www.example.com/index.html#jump
dom: <a name="jump"></a> 或者 <div id="jump" >浏览器读取到hash之后自动滚动到该对应元素所在位置的可视区域内
不附加在请求上
意味着它不管怎么变化都不会影响请求URL,即它只针对浏览器的.
浏览器: http://www.example.com/index.html#jump
服务器: http://www.example.com/index.html
注意: 有种情况是你会在URL上带#符号,但是你本意不是作为hash使用的,例如回调地址或者传参之类,这时候浏览器只会当做hash处理,所以需要先转码.
// 未转码
浏览器: http://www.example.com/index.html?test=#123
服务器: http://www.example.com/index.html?test=

// 转码
浏览器: http://www.example.com/index.html?test=%23123
服务器: http://www.example.com/index.html?test=%23123
改变访问历史但不会触发页面刷新
这个大家都知道,尽管它不会跳转也不会刷新,但是你能通过点击浏览器前进后退发现它也会被添加去访问历史记录里.(低版本IE不考虑)
缺点
- 搜索引擎不友好
- 难以追踪用户行为
思路
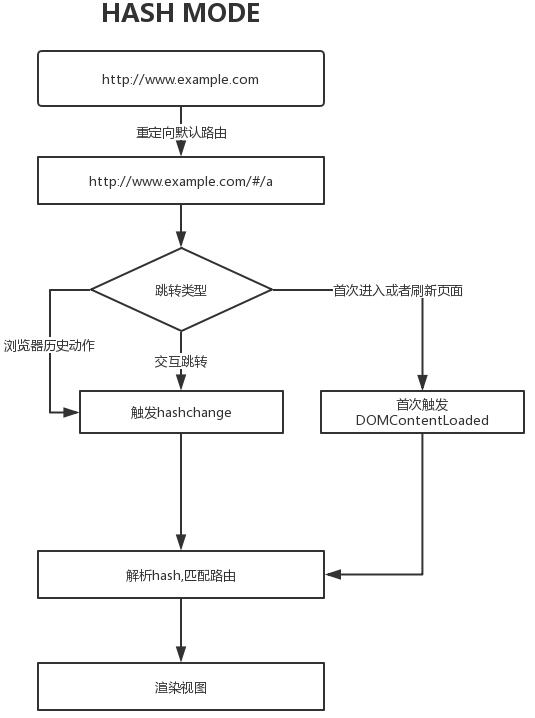
当URL的片段标识符更改时,将触发hashchange事件 (跟在#符号后面的URL部分,包括#符号),然后根据hash值做些路由跳转处理的操作.具体参数可以访问location查看
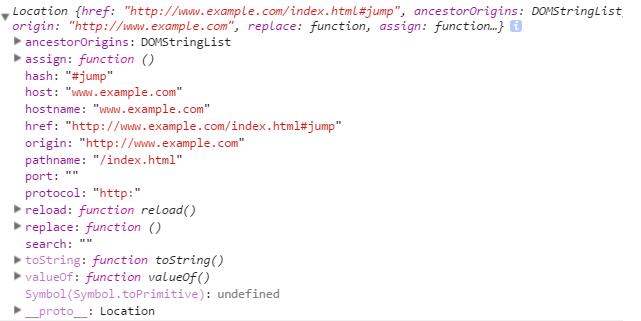
http://www.example.com/index.html#jump最基本的路由实现方法监听事件根据location.hash判断界面
<!DOCTYPE html>
<html lang="en">
    <head>
        <meta charset="UTF-8" />
        <meta name="viewport" content="width=device-width, initial-scale=1.0" />
        <meta http-equiv="X-UA-Compatible" content="ie=edge" />
        <title>Document</title>
    </head>
    <body>
        <ul>
            <li><a href="#/a">a</a></li>
            <li><a href="#/b">b</a></li>
            <li><a href="#/c">c</a></li>
        </ul>
        <div id="view"></div>

        <script>
            var view = null;
            // 页面加载完不会触发 hashchange,这里主动触发一次 hashchange 事件,该事件快于onLoad,所以需要在这里操作
            window.addEventListener('DOMContentLoaded', function() {
                view = document.querySelector('#view');
                viewChange();
            });
            // 监听路由变化
            window.addEventListener('hashchange', viewChange);

            // 渲染视图
            function viewChange() {
                switch (location.hash) {
                    case '#/b':
                        view.innerHTML = 'b';
                        break;
                    case '#/c':
                        view.innerHTML = 'c';
                        break;
                    default:
                        view.innerHTML = 'a';
                        break;
                }
            }
        </script>
    </body>
</html>
History
DOM window 对象通过 history 对象提供了对浏览器的会话历史的访问。它暴露了很多有用的方法和属性,允许你在用户浏览历史中向前和向后跳转
向前和向后跳转
window.history.back();
window.history.forward();
跳转到 history 中指定的一个点
你可以用 go() 方法载入到会话历史中的某一特定页面, 通过与当前页面相对位置来标志 (当前页面的相对位置标志为0).
window.history.go();添加历史记录中的条目
不会立即加载页面的情况下改变了当前URL地址,往历史记录添加一条条目,除非刷新页面等操作
history.pushState(state, title , URL);状态对象
state是一个JavaScript对象,popstate事件的state属性包含该历史记录条目状态对象的副本。
状态对象可以是能被序列化的任何东西。原因在于Firefox将状态对象保存在用户的磁盘上,以便在用户重启浏览器时使用,我们规定了状态对象在序列化表示后有640k的大小限制。如果你给 pushState() 方法传了一个序列化后大于640k的状态对象,该方法会抛出异常。如果你需要更大的空间,建议使用 sessionStorage 以及 localStorage.
标题
Firefox 目前忽略这个参数,但未来可能会用到。在此处传一个空字符串应该可以安全的防范未来这个方法的更改。或者,你可以为跳转的state传递一个短标题。
URL
新的历史URL记录。新URL不必须为绝对路径。如果新URL是相对路径,那么它将被作为相对于当前URL处理。新URL必须与当前URL同源,否则 pushState() 会抛出一个异常。该参数是可选的,缺省为当前URL。
注意: pushState() 绝对不会触发 hashchange 事件,即使新的URL与旧的URL仅哈希不同也是如此。
更改历史记录中的当前条目
不会立即加载页面的情况下改变了当前URL地址,并改变历史记录的当前条目,除非刷新页面等操作
history.replaceState(state, title , URL);popstate 事件
每当活动的历史记录项发生变化时, popstate 事件都会被传递给window对象。如果当前活动的历史记录项是被 pushState 创建的,或者是由 replaceState 改变的,那么 popstate 事件的状态属性 state 会包含一个当前历史记录状态对象的拷贝。
获取当前状态
页面加载时,或许会有个非null的状态对象。这是有可能发生的,举个例子,假如页面(通过pushState() 或 replaceState() 方法)设置了状态对象而后用户重启了浏览器。那么当页面重新加载时,页面会接收一个onload事件,但没有 popstate 事件。然而,假如你读取了history.state属性,你将会得到如同popstate 被触发时能得到的状态对象。
你可以读取当前历史记录项的状态对象state,而不必等待popstate 事件
思路
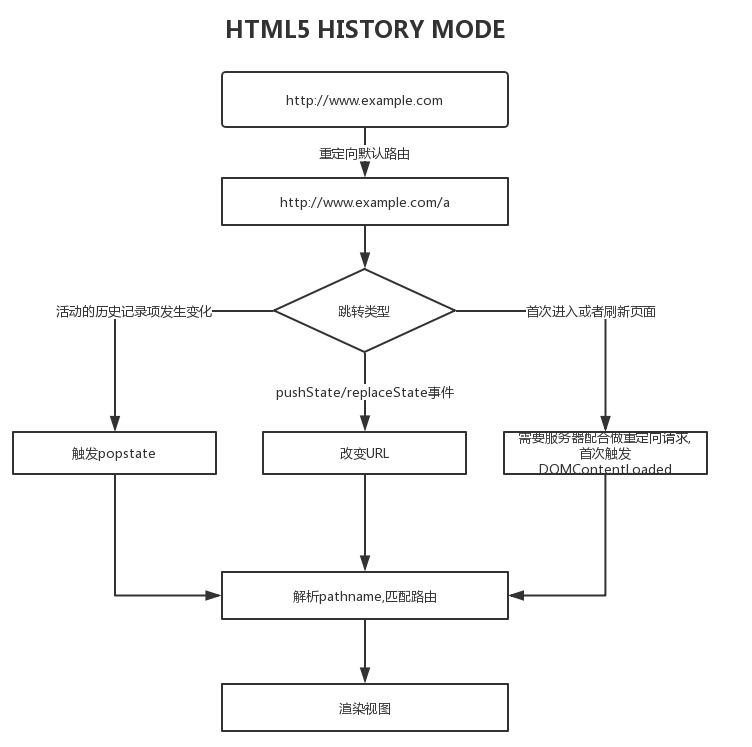
监听点击事件禁止默认跳转操作,手动利用history实现一套跳转逻辑,根据location.pathname渲染界面.
<!DOCTYPE html>
<html lang="en">
    <head>
        <meta charset="UTF-8" />
        <meta name="viewport" content="width=device-width, initial-scale=1.0" />
        <meta http-equiv="X-UA-Compatible" content="ie=edge" />
        <title>Document</title>
    </head>
    <body>
        <ul>
            <li><a href="/a">a</a></li>
            <li><a href="/b">b</a></li>
            <li><a href="/c">c</a></li>
        </ul>
        <div id="view"></div>

        <script>
            var view = null;
            // 页面加载完不会触发 hashchange,这里主动触发一次 hashchange 事件,该事件快于onLoad,所以需要在这里操作
            window.addEventListener('DOMContentLoaded', function() {
                view = document.querySelector('#view');
                document.querySelectorAll('a[href]').forEach(e =>
                    e.addEventListener('click', function(_e) {
                        _e.preventDefault();
                        history.pushState(null, '', e.getAttribute('href'));
                        viewChange();
                    })
                );

                viewChange();
            });
            // 监听路由变化
            window.addEventListener('popstate', viewChange);

            // 渲染视图
            function viewChange() {
                switch (location.pathname) {
                    case '/b':
                        view.innerHTML = 'b';
                        break;
                    case '/c':
                        view.innerHTML = 'c';
                        break;
                    default:
                        view.innerHTML = 'a';
                        break;
                }
            }
        </script>
    </body>
</html>
注意,该方法不支持本地运行,只能线上运作或者启动服务器查看效果
html5_demo.html:26 Uncaught DOMException: Failed to execute 'pushState' on 'History': A history state object with URL 'file:///C:/b' cannot be created in a document with origin 'null' and URL 'file:///C:/work/project/router_demo/src/html5_demo.html'.
at HTMLAnchorElement.<anonymous> (file:///C:/work/project/router_demo/src/html5_demo.html:26:15)
(anonymous) @ html5_demo.html:26
简单封装路由库
api
基本的路由方法:
- router.push(url, onComplete)
- router.replace(url, onComplete)
- router.go(n)
- router.back()
- router.stop()
<!DOCTYPE html>
<html>
    <head>
        <title>router</title>
    </head>

    <body>
        <ul>
            <li onclick="router.push('/a', ()=>console.log('push a'))">push a</li>
            <li onclick="router.push('/b', ()=>console.log('push b'))">push b</li>
            <li onclick="router.replace('/c', ()=>console.log('replace c'))">replace c</li>
            <li onclick="router.go(1)">go</li>
            <li onclick="router.back(-1)">back</li>
            <li onclick="router.stop()">stop</li>
        </ul>
        <div id="view"></div>
    </body>
</html>
初始化
import Router from '../router'

window.router = new Router('view', {
  routes: [
    {
      path: '/a',
      component: '<p>a</p>'
    },
    {
      path: '/b',
      component: '<p>b</p>'
    },
    {
      path: '/c',
      component: '<p>c</p>'
    },
    { path: '*', redirect: '/index' }
  ]
}, 'hash')// 或者'html5'
router类
import HashHstory from "./HashHistory";
import Html5History from "./Html5History";

export default class Router {
  constructor(wrapper, options, mode = 'hash') {
    this._wrapper = document.querySelector(`#${wrapper}`)
    if (!this._wrapper) {
      throw new Error(`你需要提供一个容器元素插入`)
    }
    // 是否支持HTML5 History 模式
    this._supportsReplaceState = window.history && typeof window.history.replaceState === 'function'
    // 匹配路径
    this._cache = {}
    // 默认路由
    this._defaultRouter = options.routes[0].path
    this.route(options.routes)
    // 启用模式
    this._history = (mode !== 'hash' && this._supportsReplaceState) ? new Html5History(this, options) : new HashHstory(this, options)
  }

  // 添加路由
  route(routes) {
    routes.forEach(item => this._cache[item.path] = item.component)
  }

  // 原生浏览器前进
  go(n = 1) {
    window.history.go(n)
  }

  // 原生浏览器后退
  back(n = -1) {
    window.history.go(n)
  }

  // 增加
  push(url, onComplete) {
    this._history.push(url, onComplete)
  }

  // 替换
  replace(url, onComplete) {
    this._history.replace(url, onComplete)
  }

  // 移除事件
  stop() {
    this._history.stop()
  }
}
Hash Class
export default class HashHistory {
  constructor(router, options) {
    this.router = router
    this.onComplete = null
    // 监听事件
    window.addEventListener('load', this.onChange)
    window.addEventListener('hashchange', this.onChange)
  }

  onChange = () => {
    // 匹配失败重定向
    if (!location.hash || !this.router._cache[location.hash.slice(1)]) {
      window.location.hash = this.router._defaultRouter
    } else {
      // 渲染视图
      this.router._wrapper.innerHTML = this.router._cache[location.hash.slice(1)]
      this.onComplete && this.onComplete() && (this.onComplete = null)
    }
  }

  push(url, onComplete) {
    window.location.hash = `${url}`
    onComplete && (this.onComplete = onComplete)
  }

  replace(url, onComplete) {
    // 优雅降级
    if (this.router._supportsReplaceState) {
      window.location.hash = `${url}`
      window.history.replaceState(null, null, `${window.location.origin}#${url}`)
    } else {
      // 需要先看看当前URL是否已经有hash值
      const href = location.href
      const index = href.indexOf('#')
      url = index > 0
        ? `${href.slice(0, index)}#${url}`
        : `${href}#${url}`
      // 域名不变的情况下不会刷新页面
      window.location.replace(url)
    }

    onComplete && (this.onComplete = onComplete)
  }

  // 移除事件
  stop() {
    window.removeEventListener('load', this.onChange)
    window.removeEventListener('hashchange', this.onChange)
  }
}
HTML5 Class
export default class Html5Hstory {
  constructor(router, options) {
    this.addEvent()
    this.router = router
    this.onComplete = null
    // 监听事件
    window.addEventListener('popstate', this.onChange)
    window.addEventListener('load', this.onChange)
    window.addEventListener('replaceState', this.onChange);
    window.addEventListener('pushState', this.onChange);
  }

  // pushState/replaceState不会触发popstate事件,所以我们需要自定义
  addEvent() {
    const listenWrapper = function (type) {
      const _func = history[type];
      return function () {
        const func = _func.apply(this, arguments);
        const e = new Event(type);
        e.arguments = arguments;
        window.dispatchEvent(e);
        return func;
      };
    };
    history.pushState = listenWrapper('pushState');
    history.replaceState = listenWrapper('replaceState');
  }

  onChange() {
    // 匹配失败重定向
    if (location.pathname === '/' || !this.router._cache[location.pathname]) {
      window.history.pushState(null, '', `${window.location.origin}${this.router._defaultRouter}`);
    } else {
      // 渲染视图
      this.router._wrapper.innerHTML = this.router._cache[location.pathname]
      this.onComplete && this.onComplete() && (this.onComplete = null)
    }
  }

  push(url, onComplete) {
    window.history.pushState(null, '', `${window.location.origin}${url}`);
    onComplete && (this.onComplete = onComplete)
  }

  replace(url, onComplete) {
    window.history.replaceState(null, null, `${window.location.origin}${url}`)
    onComplete && (this.onComplete = onComplete)
  }

  // 移除事件
  stop() {
    window.removeEventListener('load', this.onChange)
    window.removeEventListener('popstate', this.onChange)
    window.removeEventListener('replaceState', this.onChange)
    window.removeEventListener('pushState', this.onChange)
  }
}vue路由history模式_如何去除vue项目中的#
在使用vue-cli搭建的环境中,浏览器上URL地址中是存在#的,这是由于vue-router 默认 hash 模式,不难发现#的出现真的很丑陋。官网给出了如何使用history模式mode: history
vue路由传参主要的3种方式
vue中路由传参主要的3种方式:query方式(push时使用path来匹配)、params模式(push时使用name来匹配)、location预声明参数模式(push使用path来匹配,但是它跟params模式不同)
vue动态加载路由_实现vue动态加载路由器设置
我们的通用的后台管理系统中,我们会根据权限的粗细不同,会对每个角色每个权限每个资源进行控制。同样的我们也需要实现一个这样的功能。 这篇文章我将主要讲vue端的实现,关于后台接口我就不会涉及,当我接触的时候我们的后台接口是springcloud实现。
两种前端路由的实现方式
前后端分离开发模式,后端会把路由控制丢在前端,这几天再开发单页面小的项目,手动撸了个路由。前端路由实现有两种方法。HTML5 History API包括2个方法:history.pushState()和history.replaceState(),和1个事件:window.onpopstate。hash + location.onhashchange

vue动态路由_vue-router通过接口请求动态生成路由的实现
在后台管理系统中,一般都会采用权限管理。路由菜单数据都会保存到数据库中,在vue-router 2.2版本新增了一个router.addRoutes(routes)方法,即可用它来实现动态路由了
HTML5 History 模式
vue-router 默认 hash 模式 —— 使用 URL 的 hash 来模拟一个完整的 URL,于是当 URL 改变时,页面不会重新加载。如果不想要很丑的 hash,我们可以用路由的 history 模式,这种模式充分利用 history.pushState API 来完成 URL 跳转而无须重新加载页面。
vue router 路由鉴权(非动态路由)
原本想用动态路由的思路去做,按权限加载对应路由表,但是由于权限可以交叉(比如一个人可以同时是主题管理员和数据服务管理员),导致权限路由表还是得去做判断组合。于是放弃了这个思路,索性就在beforeEach里直接判断了。
vue中路由按需加载的几种方式
使用vue-cli构建项目后,我们会在Router文件夹下面的index.js里面引入相关的路由组件,webpack在打包的时候会把整个路由打包成一个js文件,如果页面一多,会导致这个文件非常大,加载缓慢
vue-router 中参数传递(params,query)
query和params的区别,query相当于get请求,在页面跳转的时候,可以在地址栏看到请求参数,然而params则相当于post请求,参数不会在地址栏中显示。
Node.js的路由
当服务端接收到HTTP请求时,可以通过onRequest() 获取到url, pathname,query,及paramParams参数;为了解析这些数据需要使用url和querystring模块
内容以共享、参考、研究为目的,不存在任何商业目的。其版权属原作者所有,如有侵权或违规,请与小编联系!情况属实本人将予以删除!